Week 7: 1990s

Come as You Are is a grunge song by the band Nirvana written by the front man Kurt Cobain and Produced by Butch Vig. It was released in 1992 from the band’s second studio album Nevermind. The track features Kurt Cobain (vocals, acoustic guitar and electric guitar), Kirst Novoselic (bass guitar), Dave Grohl (drums). Nirvana recorded this track on tape and sent this to Butch Vig prior to the recording of the album. During the recording of this song, Cobain recorded his guitar solo in two takes, and vocals in three takes, with the first take being the final one used, it was then double tracked. Cobain also used a Electro-Harmonix Small Clone guitar chorus pedal during the verses and pre choruses to give his guitar a “watery” tone (https://en.wikipedia.org/wiki/Come_as_You_Are_(Nirvana_song)).

This lyrical origin of this track is not actually known, however Nirvana expert Charles R. Cross believes that the possible origin could have come from Aberdeen’s (Kurt’s home town) Morck Hotel whose motto was “Come as you are” and was one of the places in Aberdeen where Kurt crashed during the four months he was homeless after a fight with his mother at the age of 17 (https://musicfeeds.com.au/news/nirvanas-come-as-you-are-lyrics-may-have-a-new-meaning/).

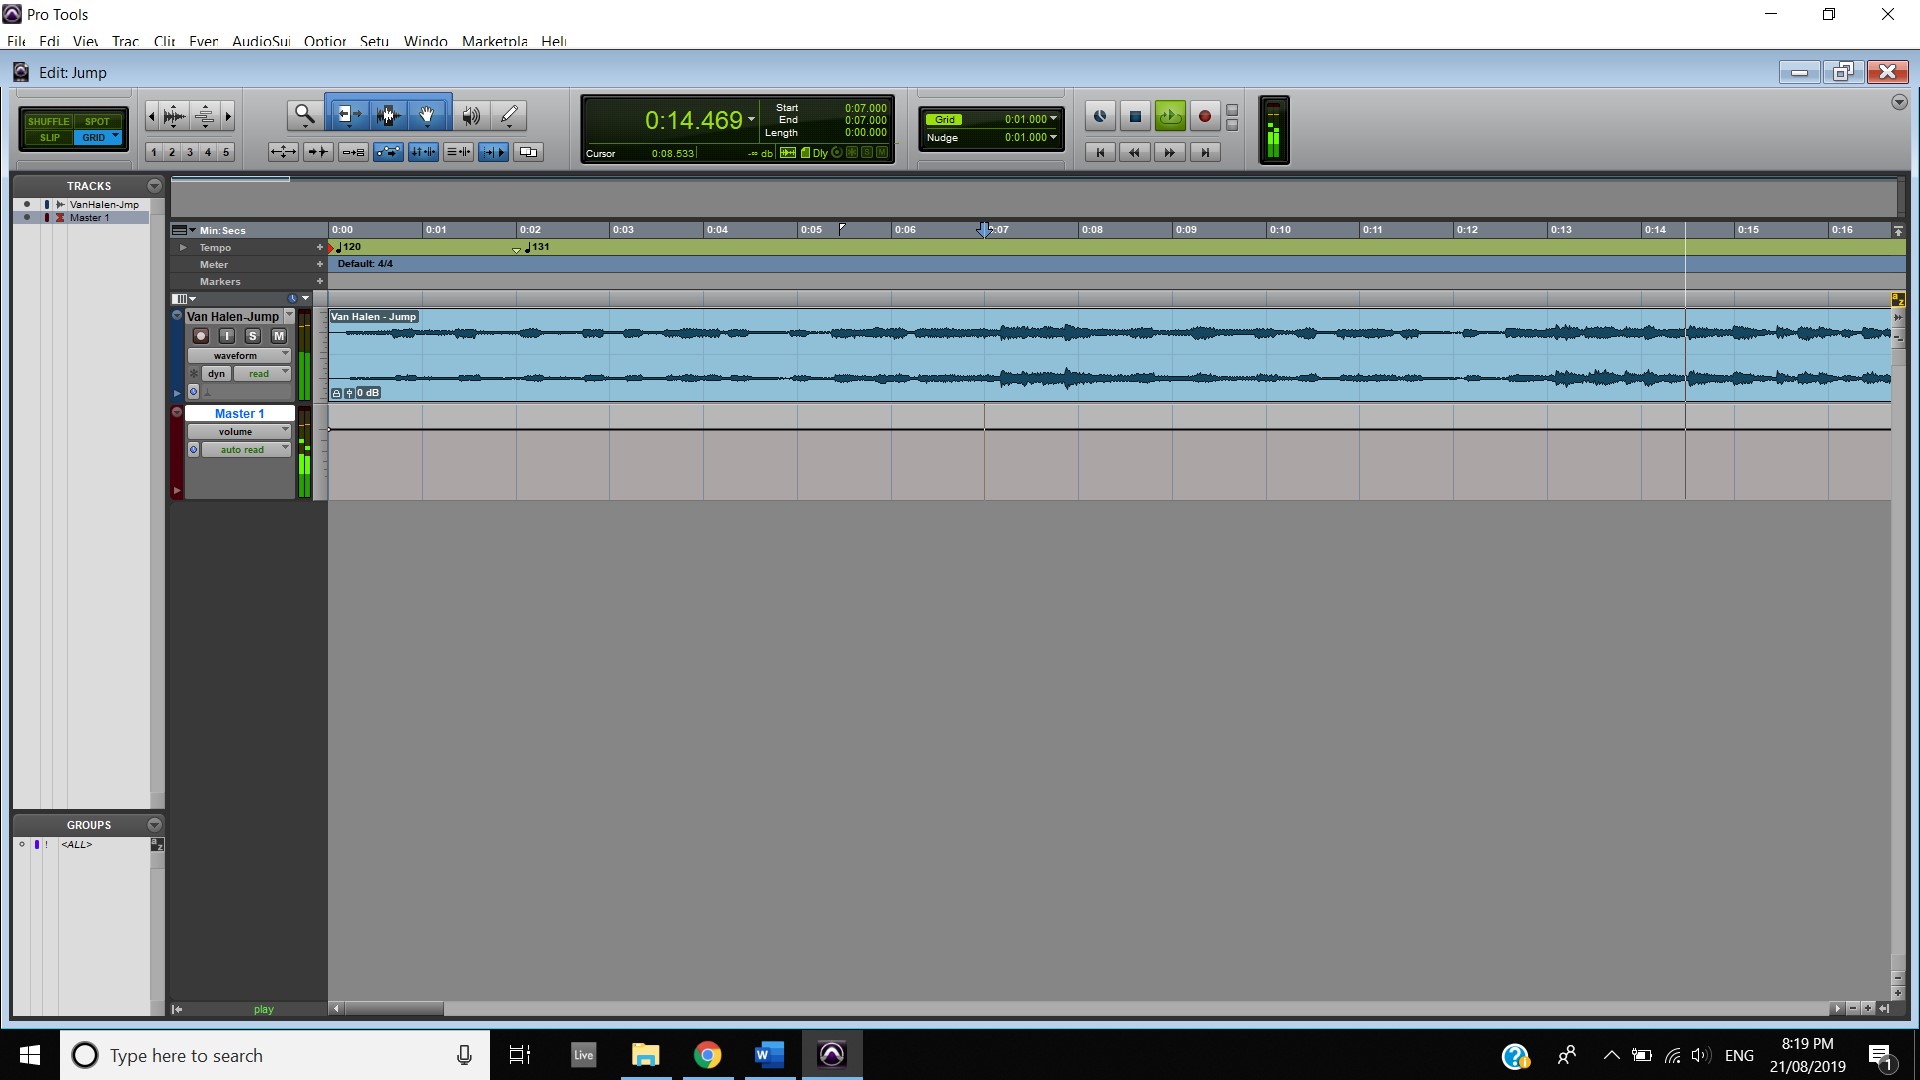
The track is in the key of E minor at a tempo of 120 BPM with a time signature of 4/4 (https://tunebat.com/Info/Come-As-You-Are-Nirvana/0MKGH8UMfCnq5w7nG06oM5 & https://en.wikipedia.org/wiki/Come_as_You_Are_(Nirvana_song)).

During recording, Cobain accidentally sung the lyrics “and I don’t have a gun” early, this is after the fourth “memoria” after the guitar solo at 2:44 mins. When the mistake was discovered, it was decided to be kept in the final recording. Butch Vig also sampled Kurt singing “memoria” from the middle of the song and used it a the end of the song, shown at 3:15 mins – 3:30 mins (https://en.wikipedia.org/wiki/Come_as_You_Are_(Nirvana_song)).

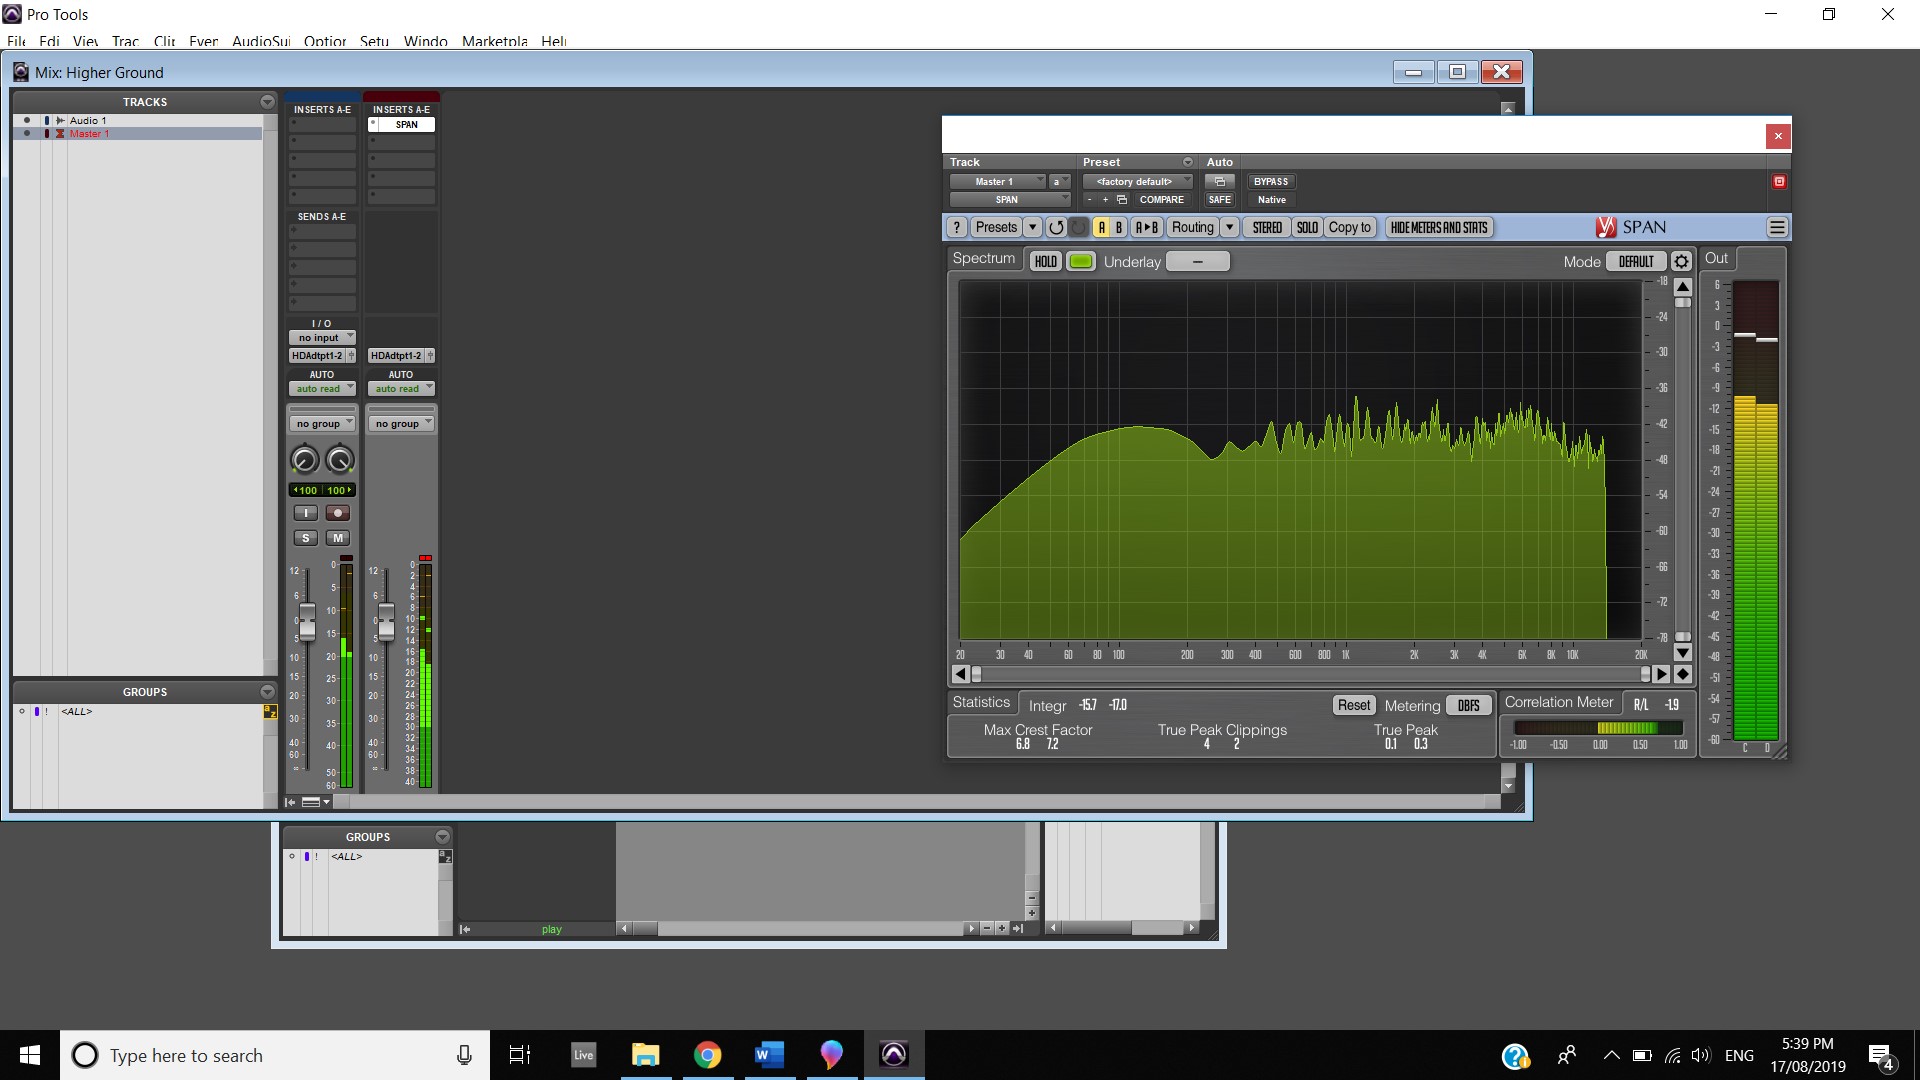
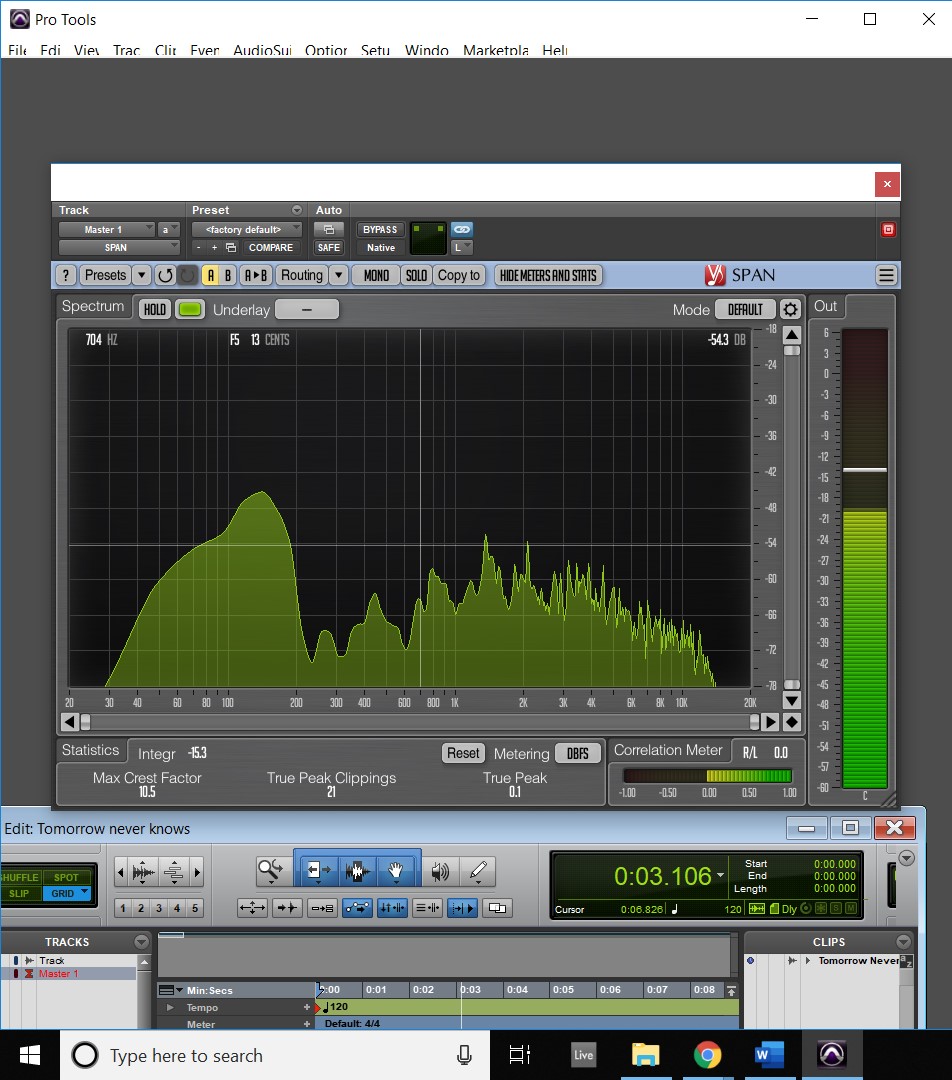
This track has quite a dark, dense tone, this is due to the timbre of the instruments in the track such as the effect the guitar pedal has on the guitar, the way Kurt Cobain sings and portrays his voice and finally the genre of music that Nirvana is known for, which is Grunge which has been described as “ a punk and metal hybrid style of music” (https://en.wikipedia.org/wiki/Grunge). Throughout the song, the frequency response changes and develops. During the intro all of the low frequencies are the centre of attention thanks to the drums and the effect the guitar pedal provides.

Intro

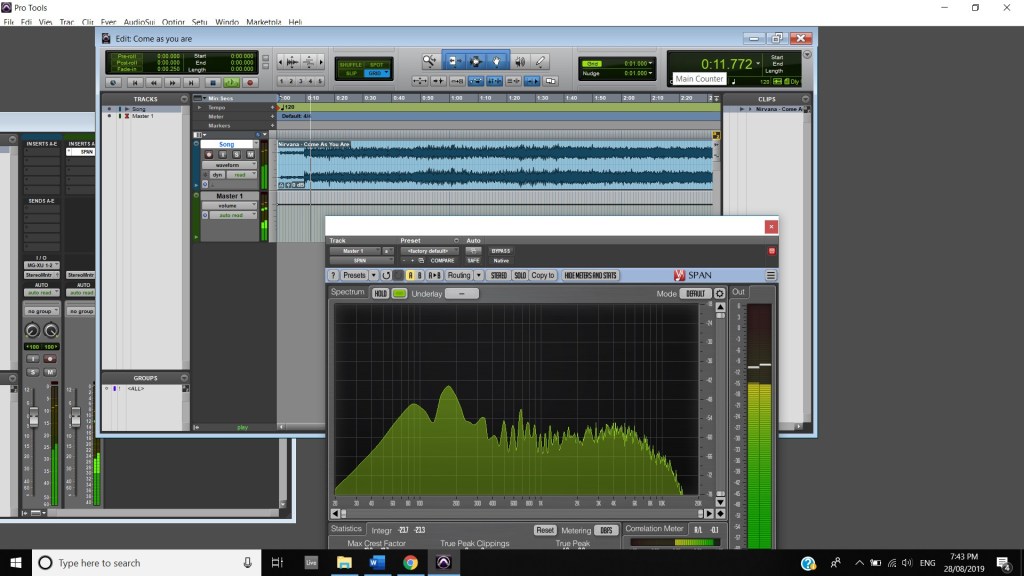
Then as the vocals appear in the mix certain parts of Cobain’s voice spike the mid frequencies in the analyser.

Vocal Spike

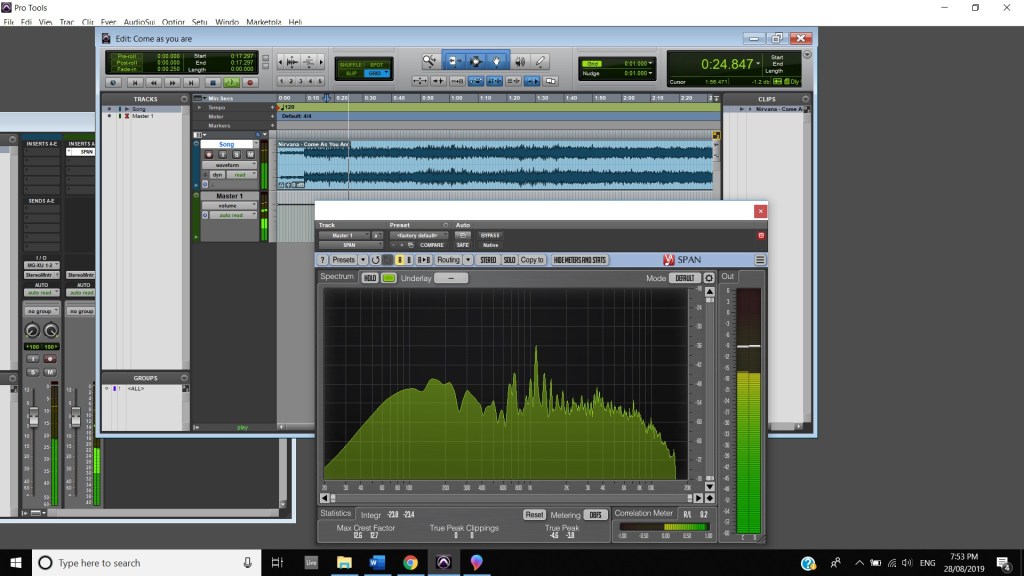
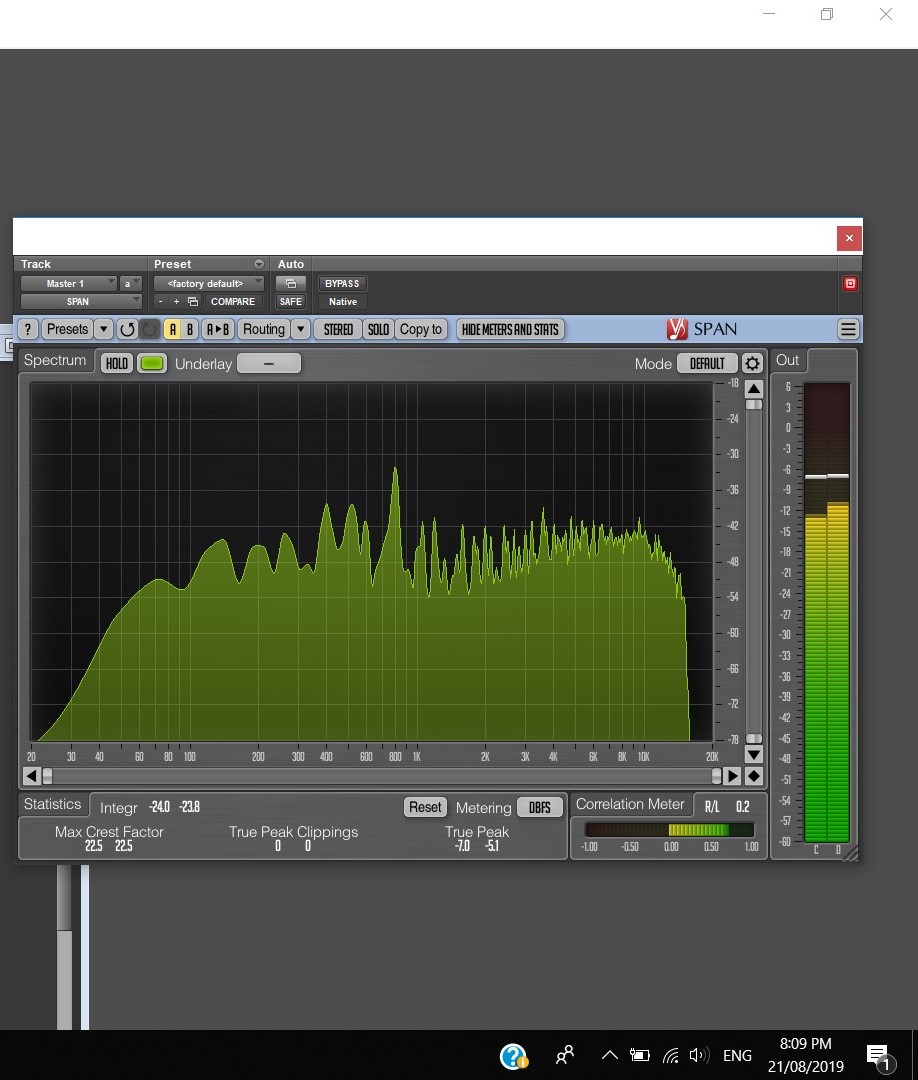
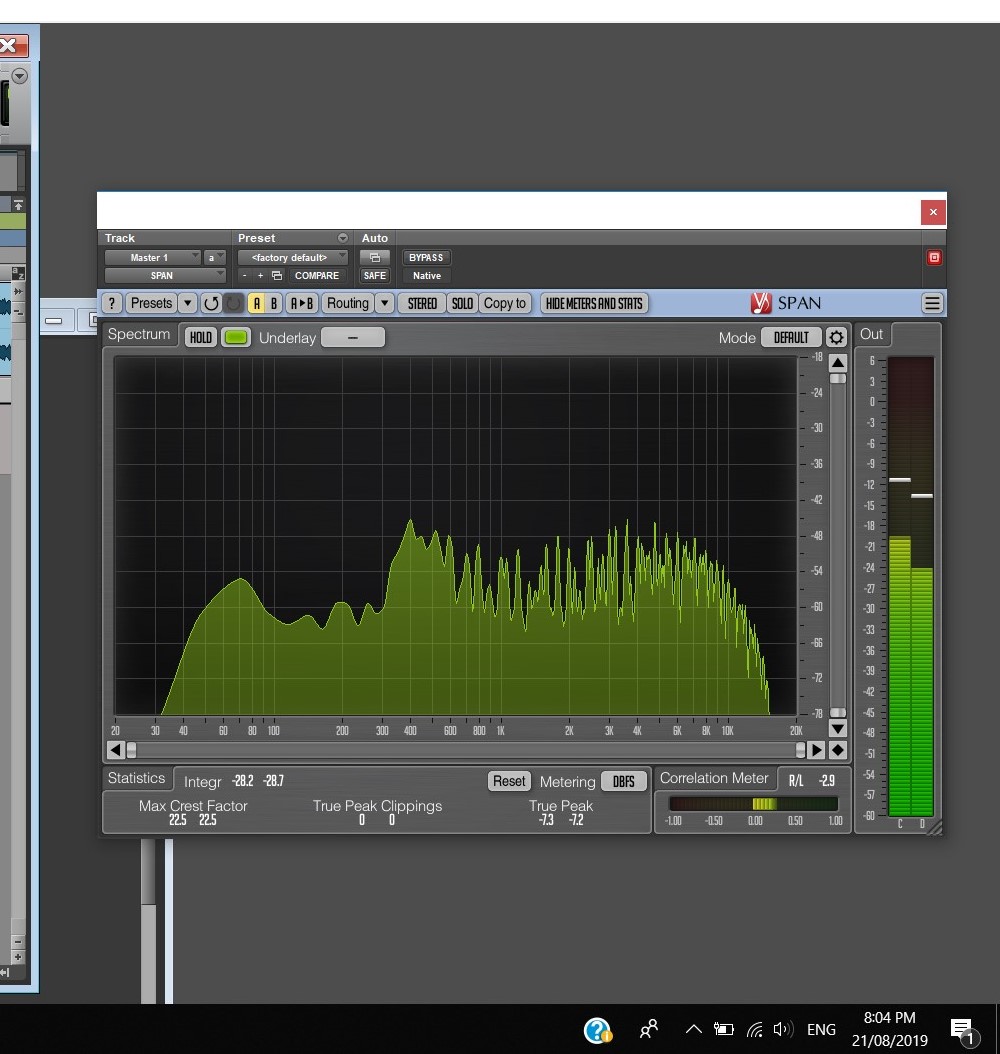
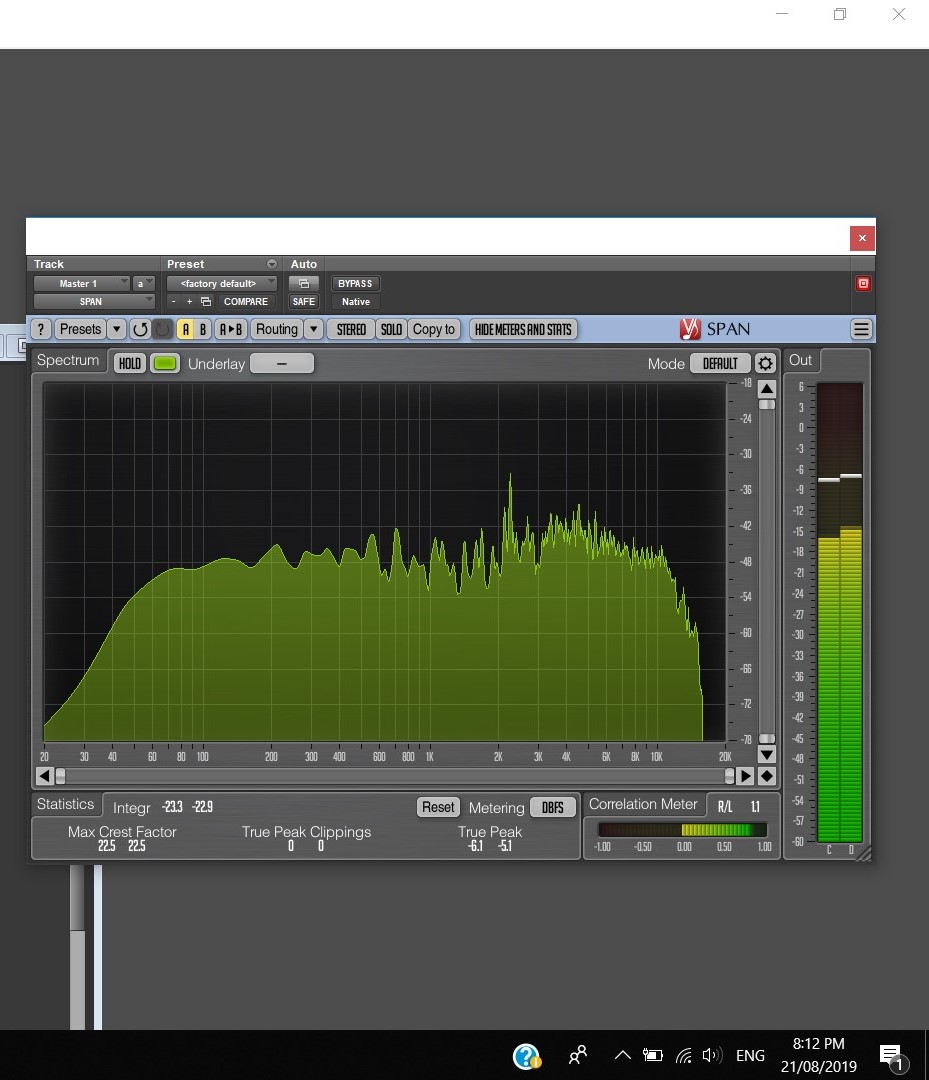
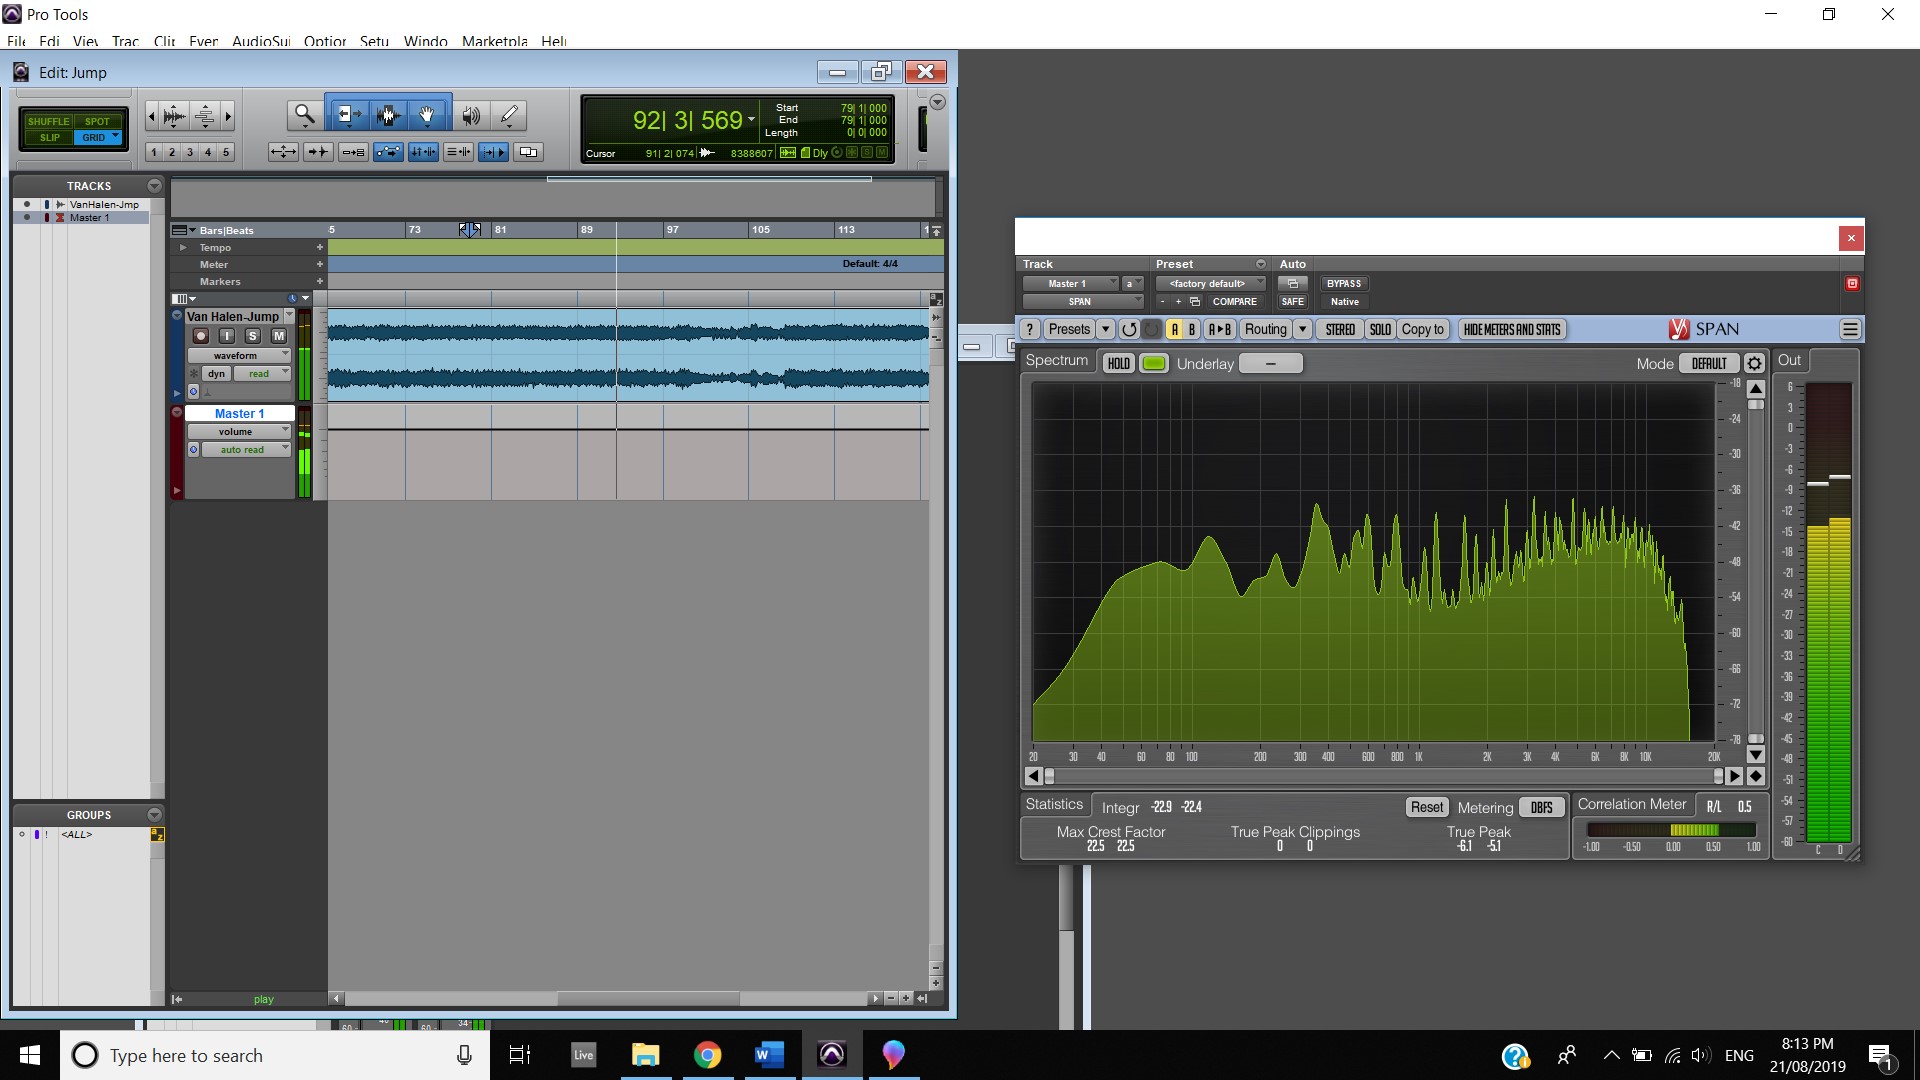
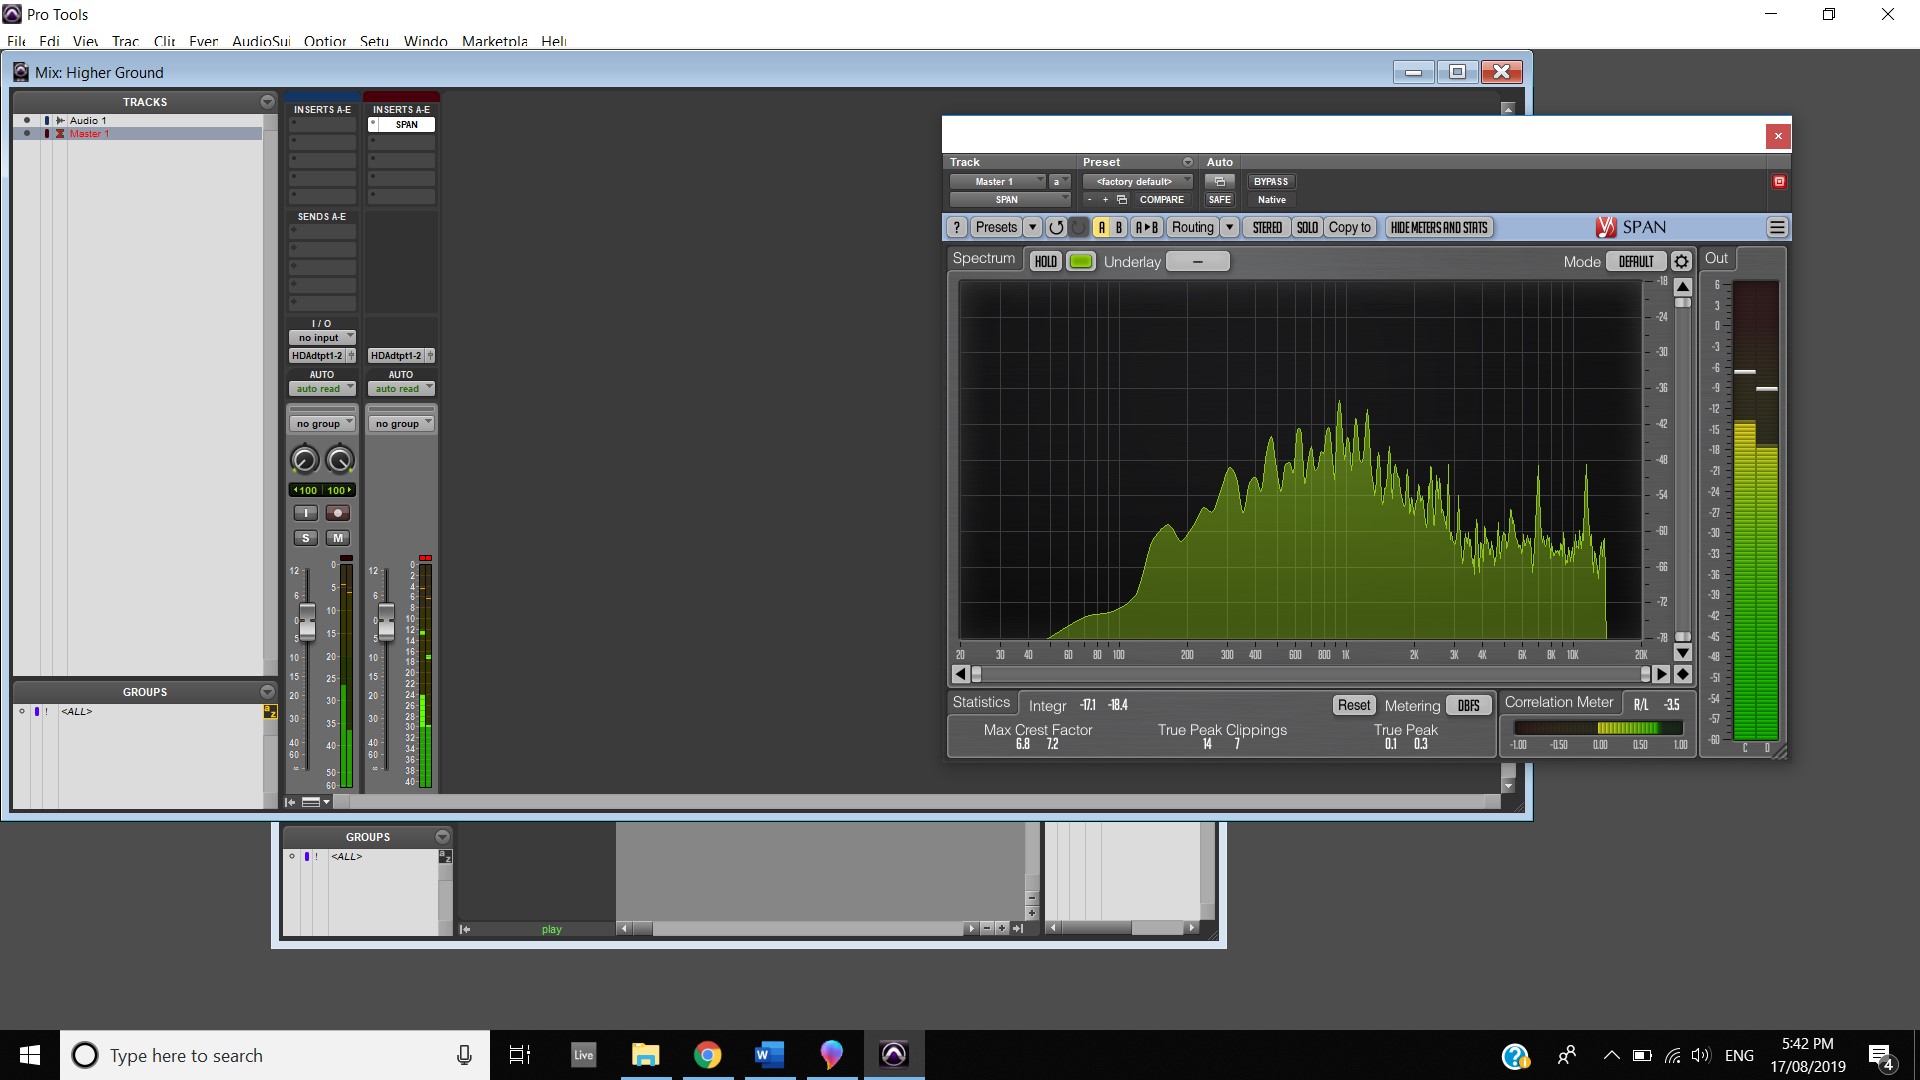
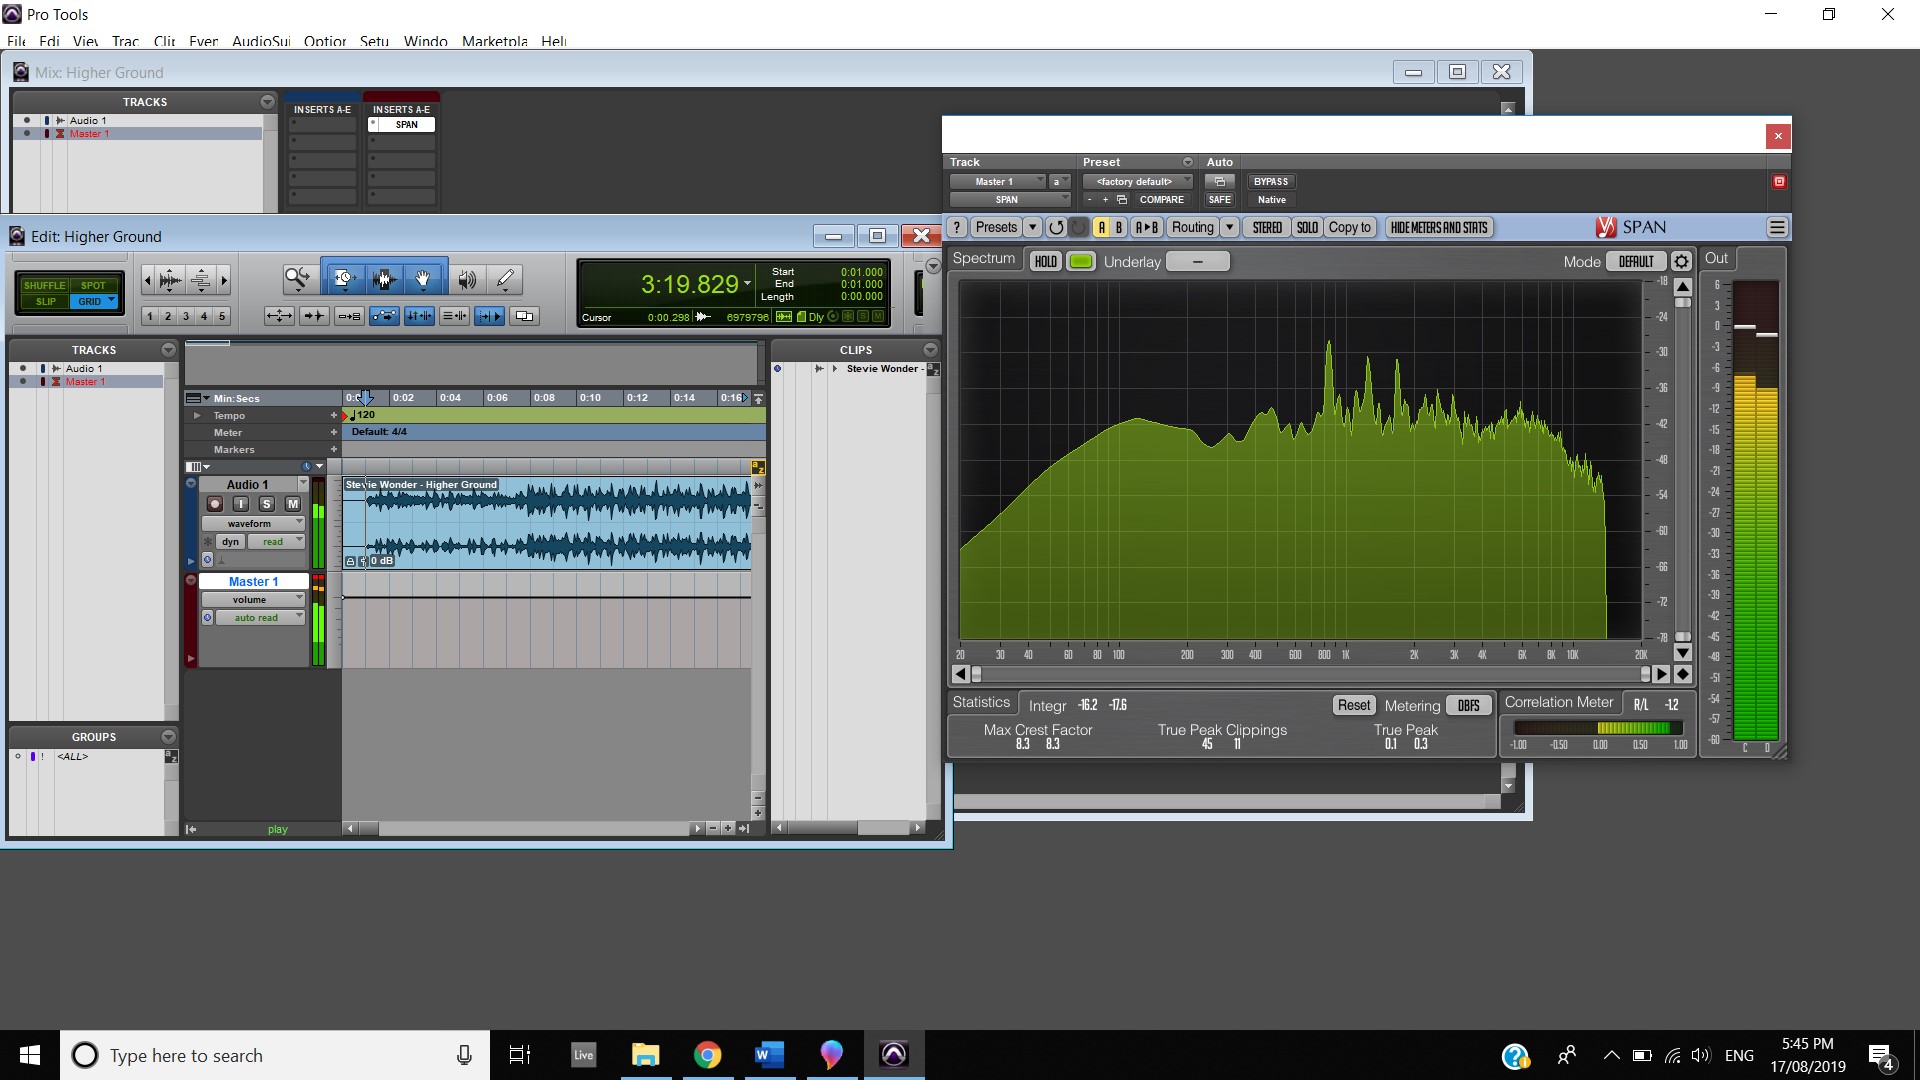
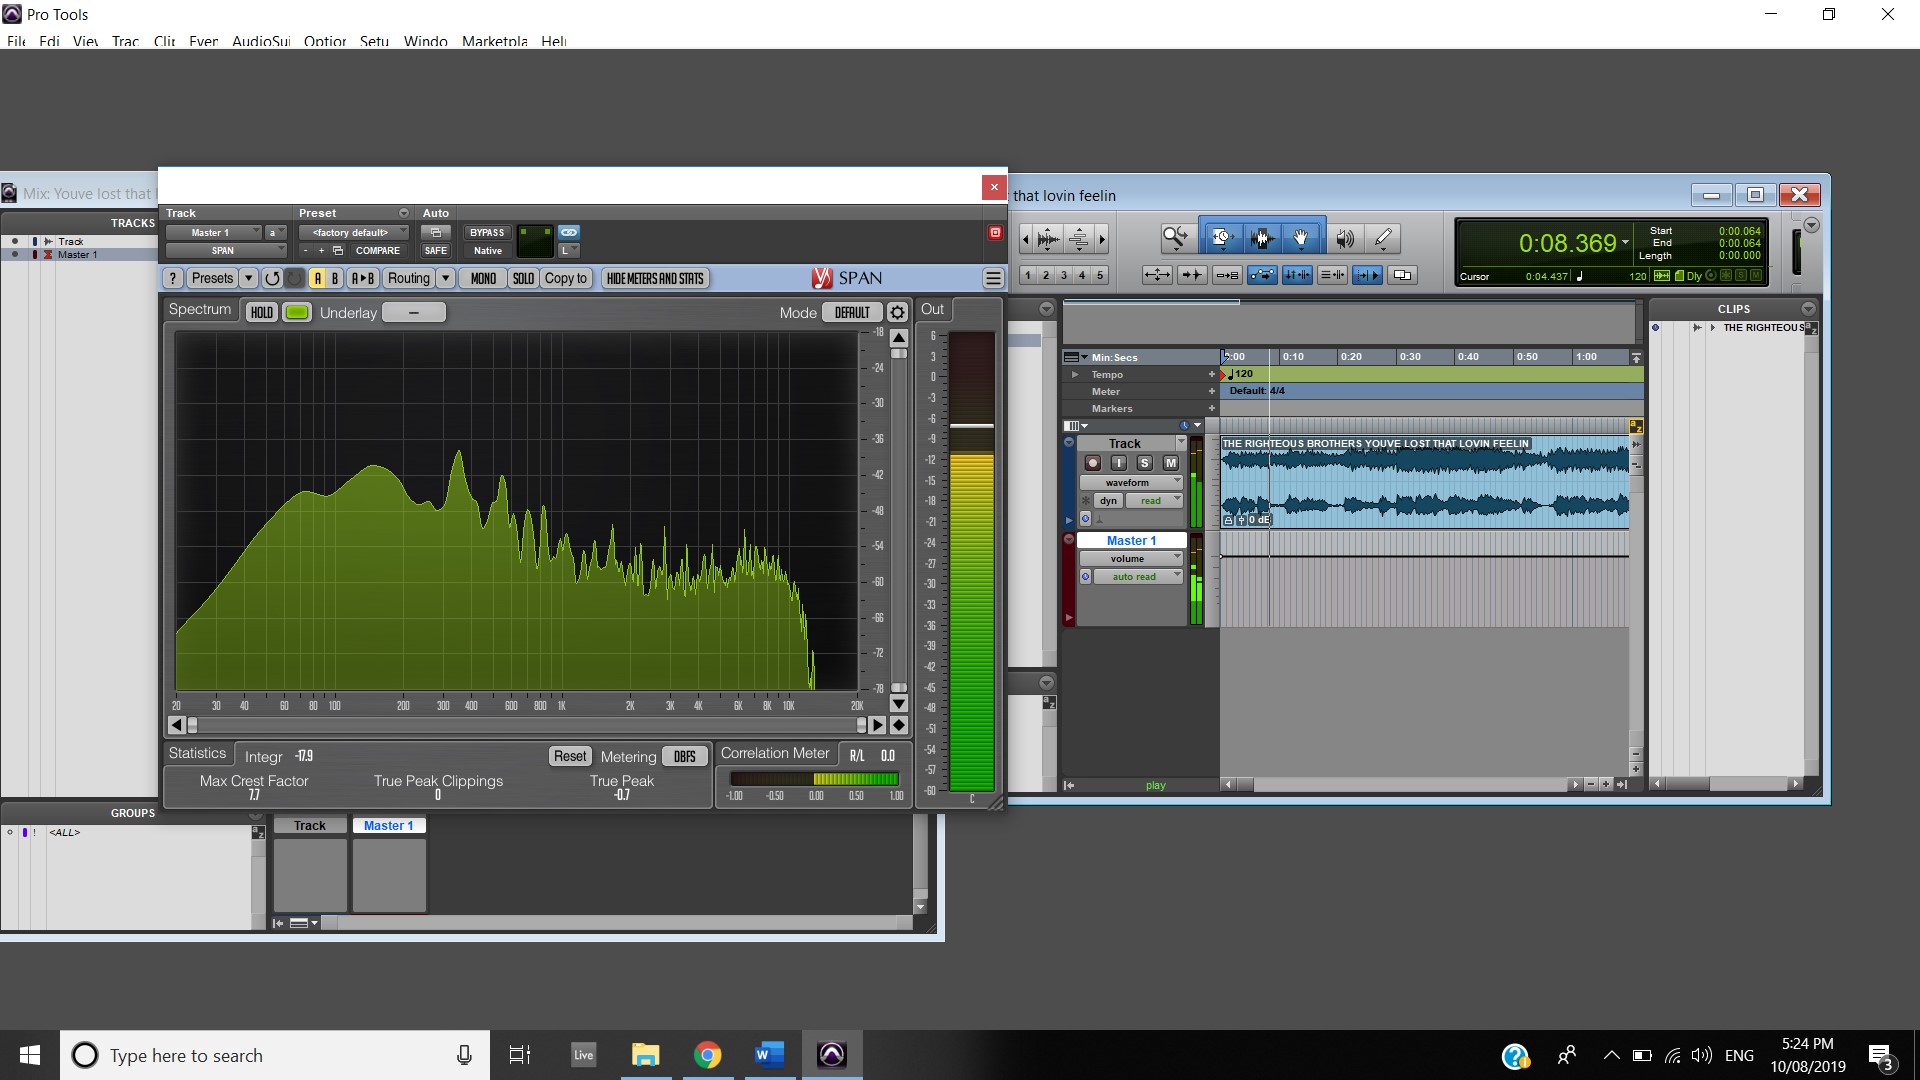
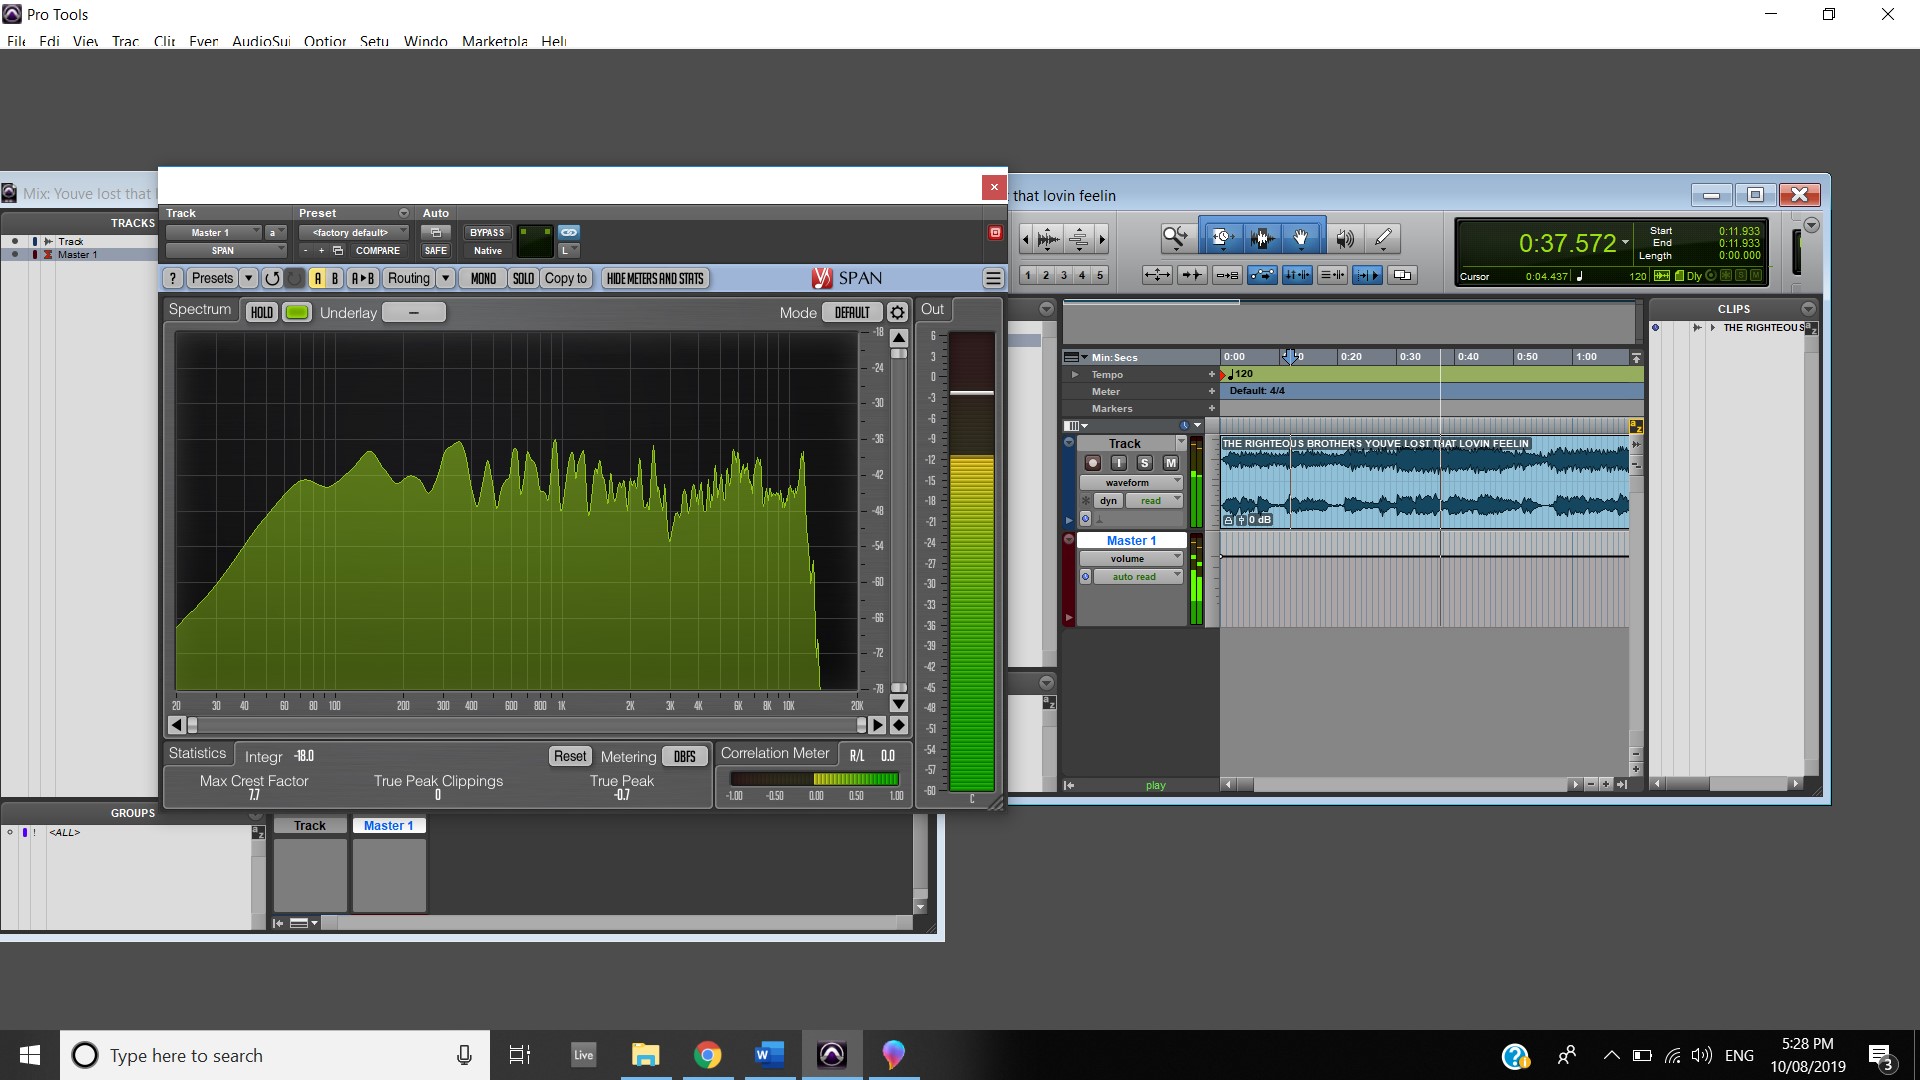
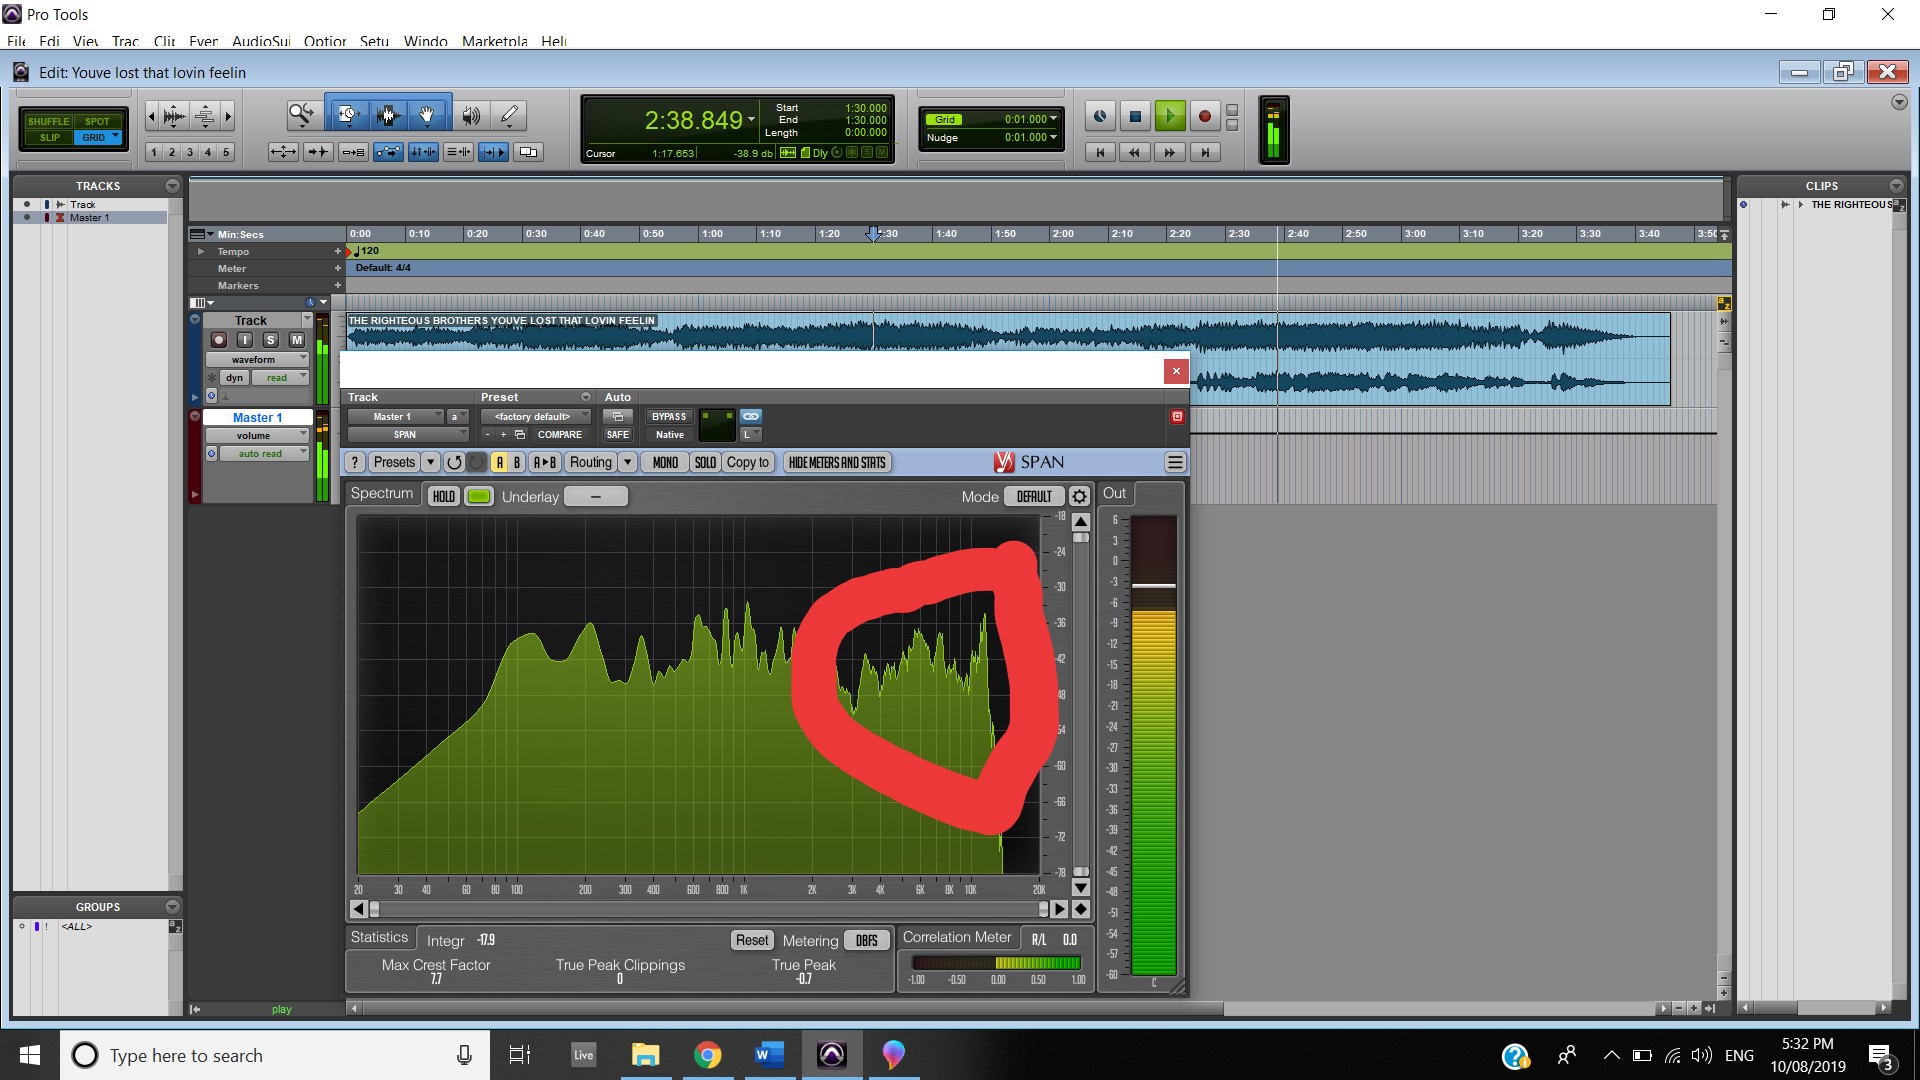
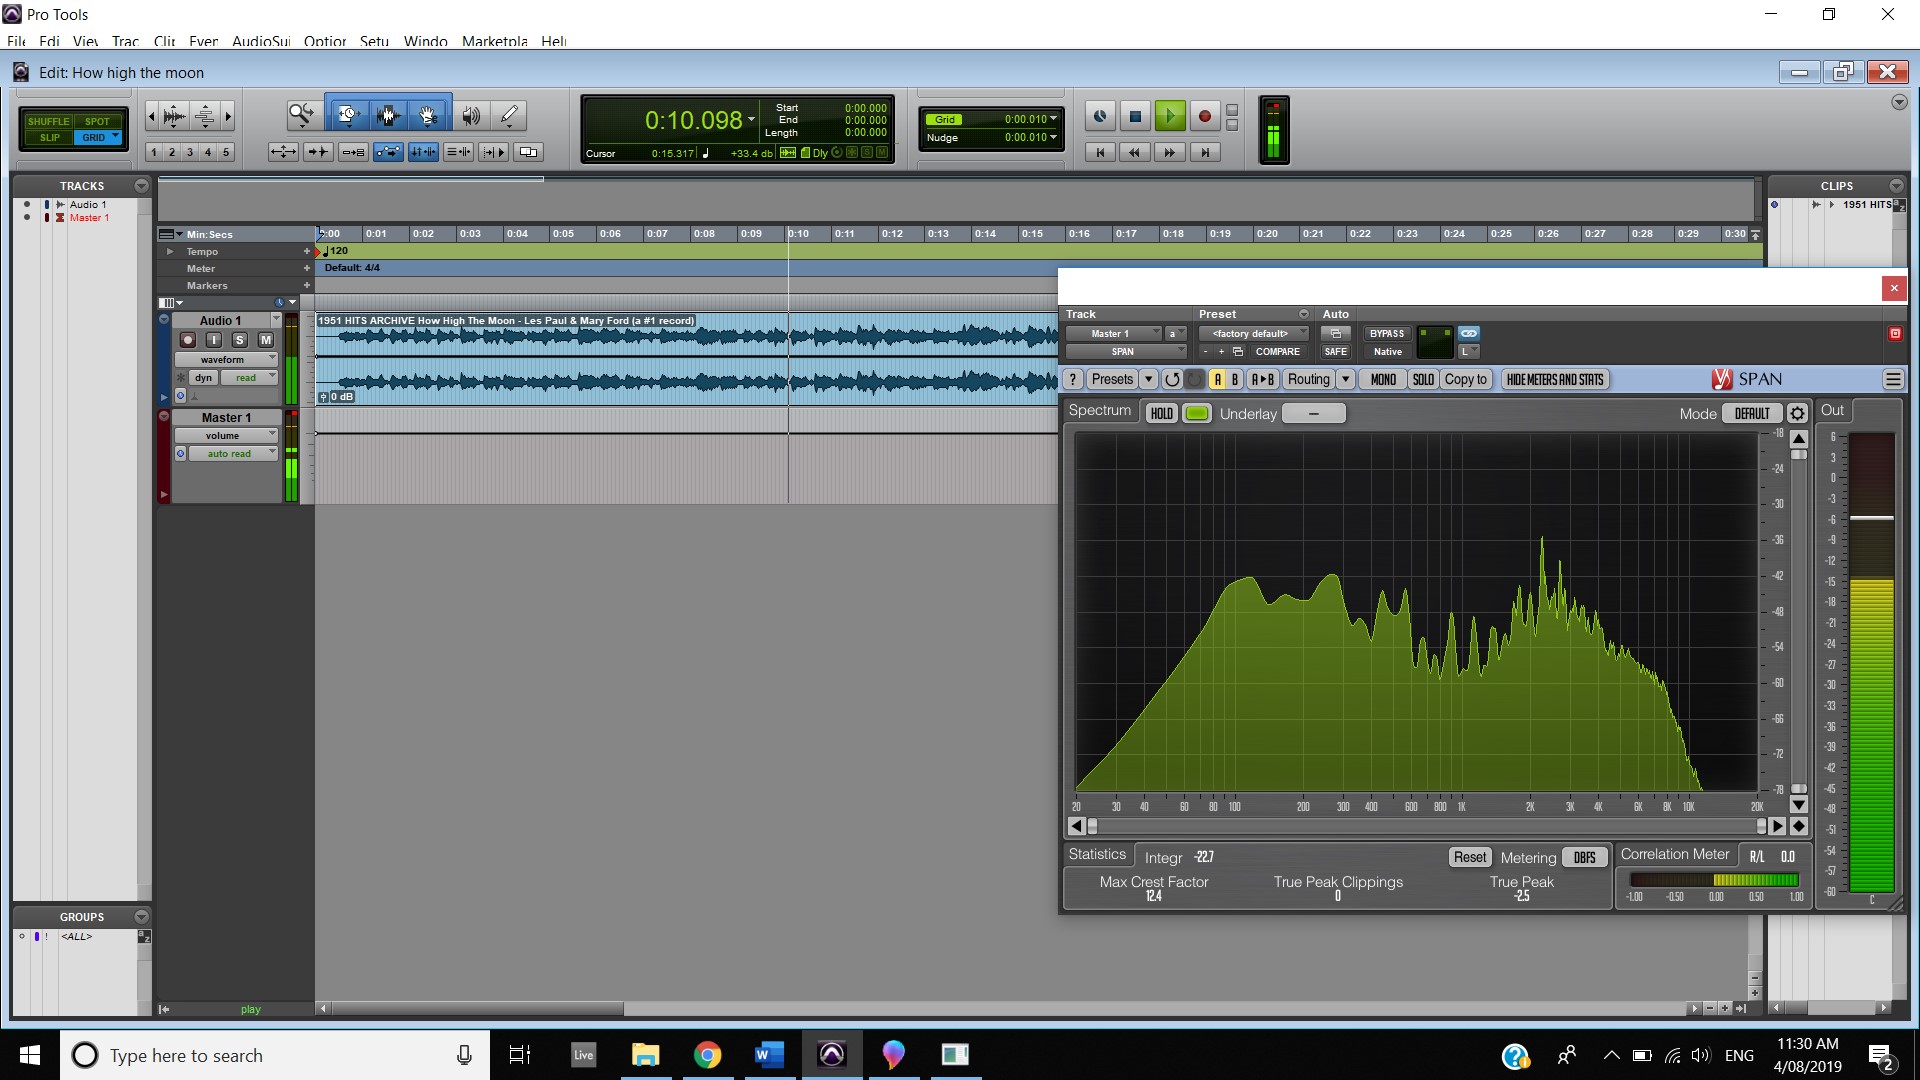
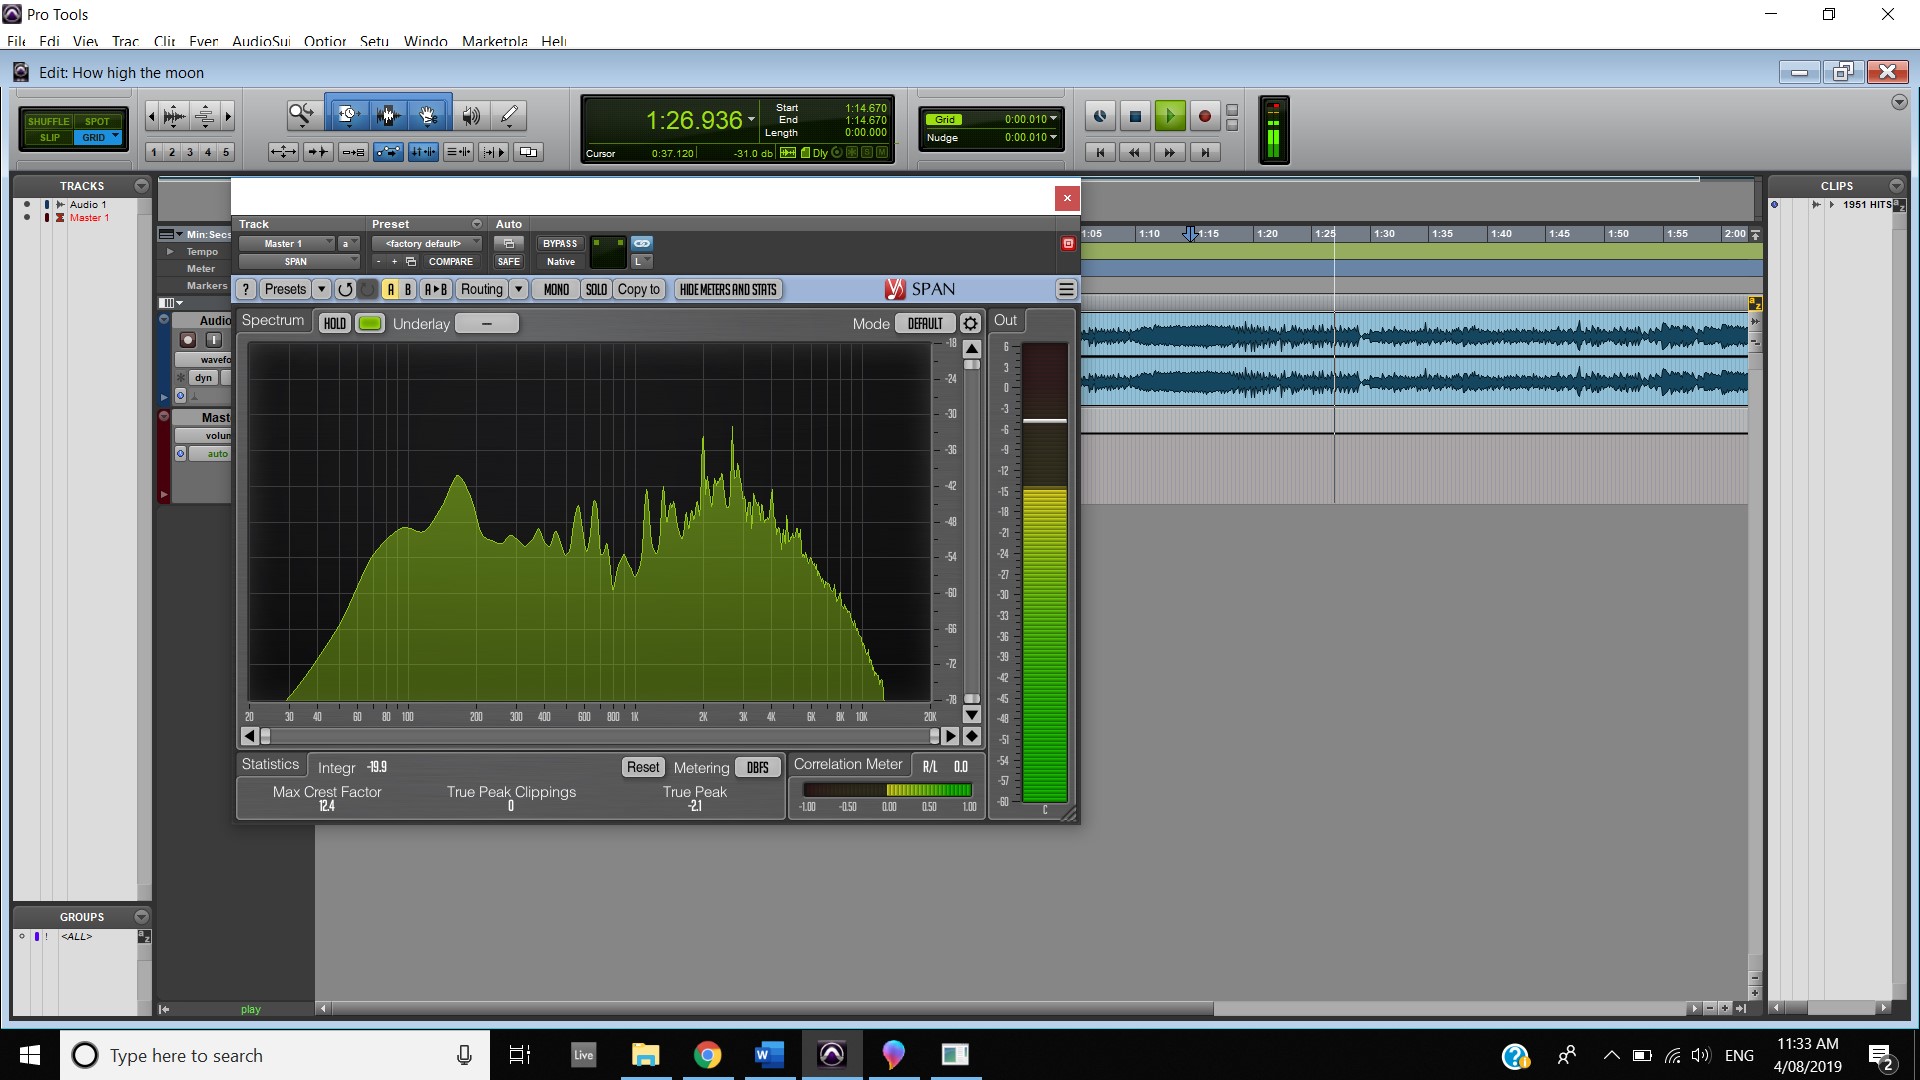
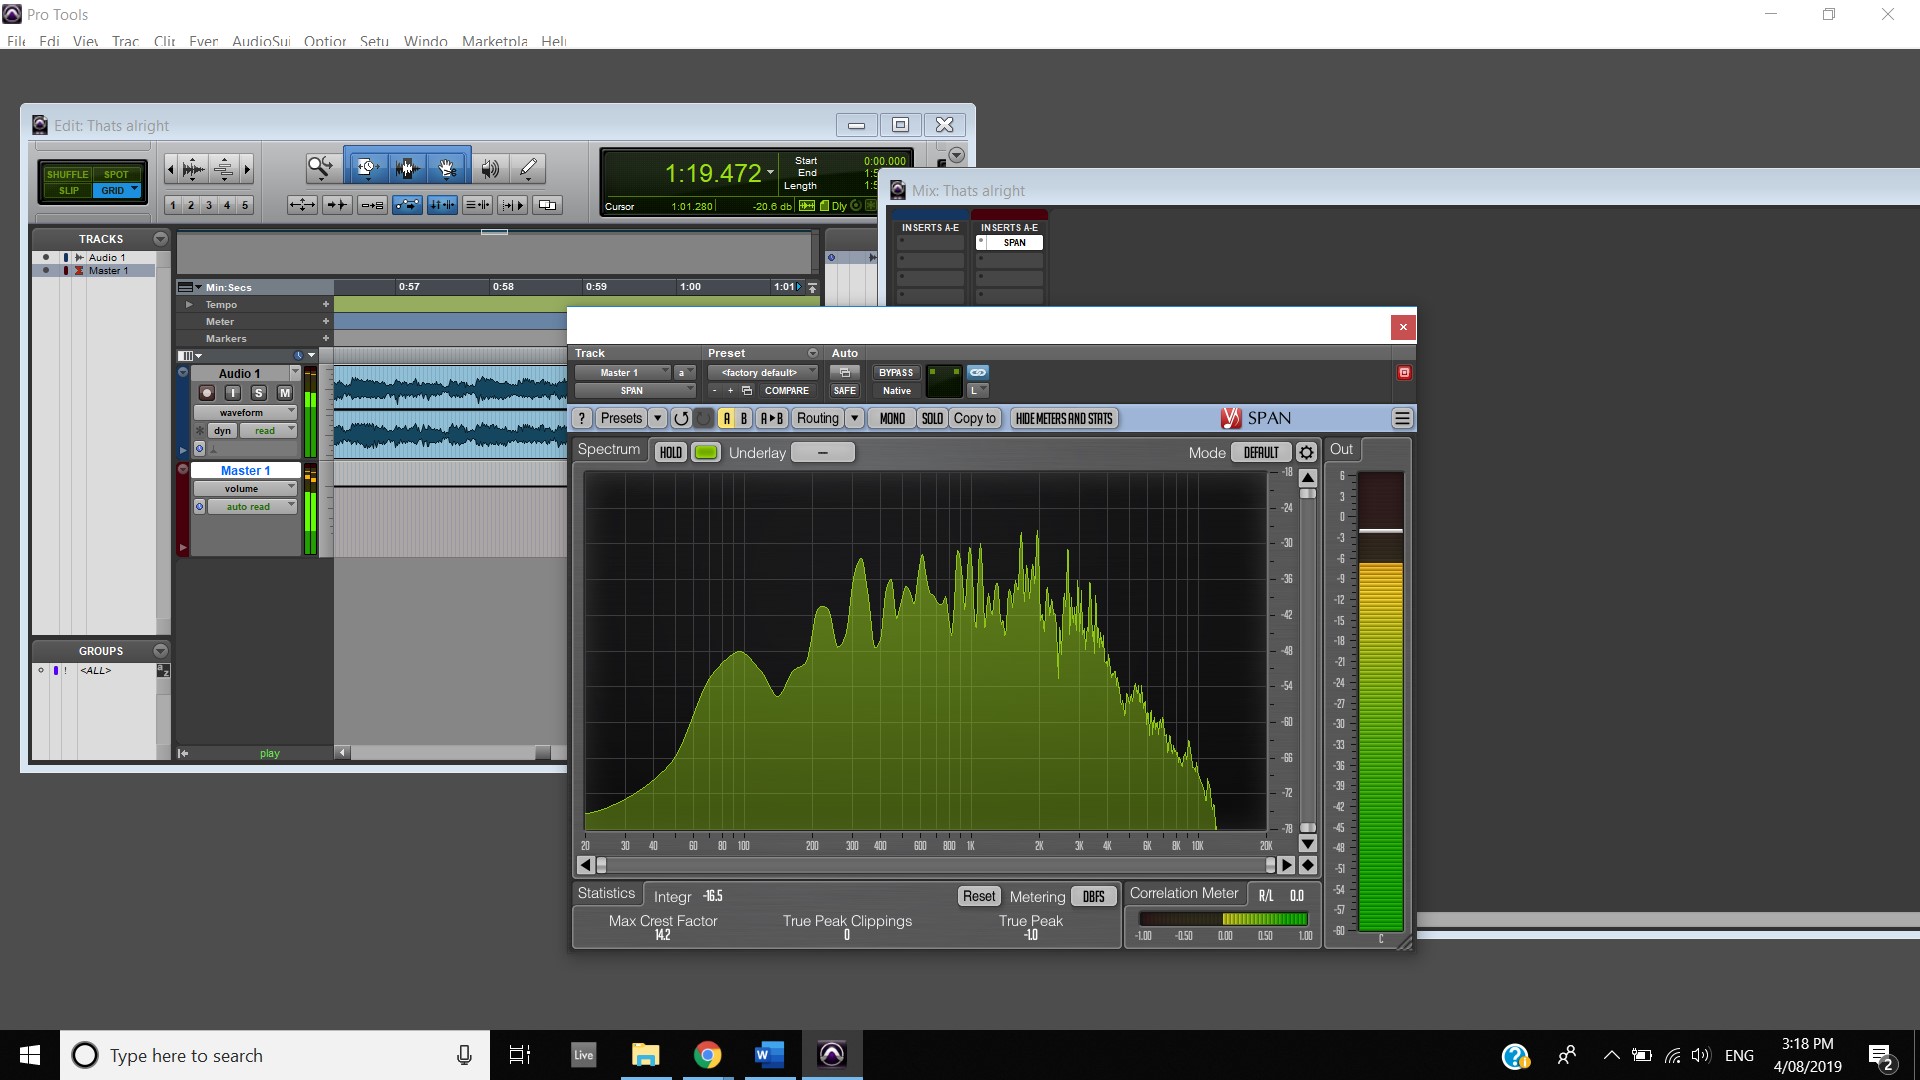
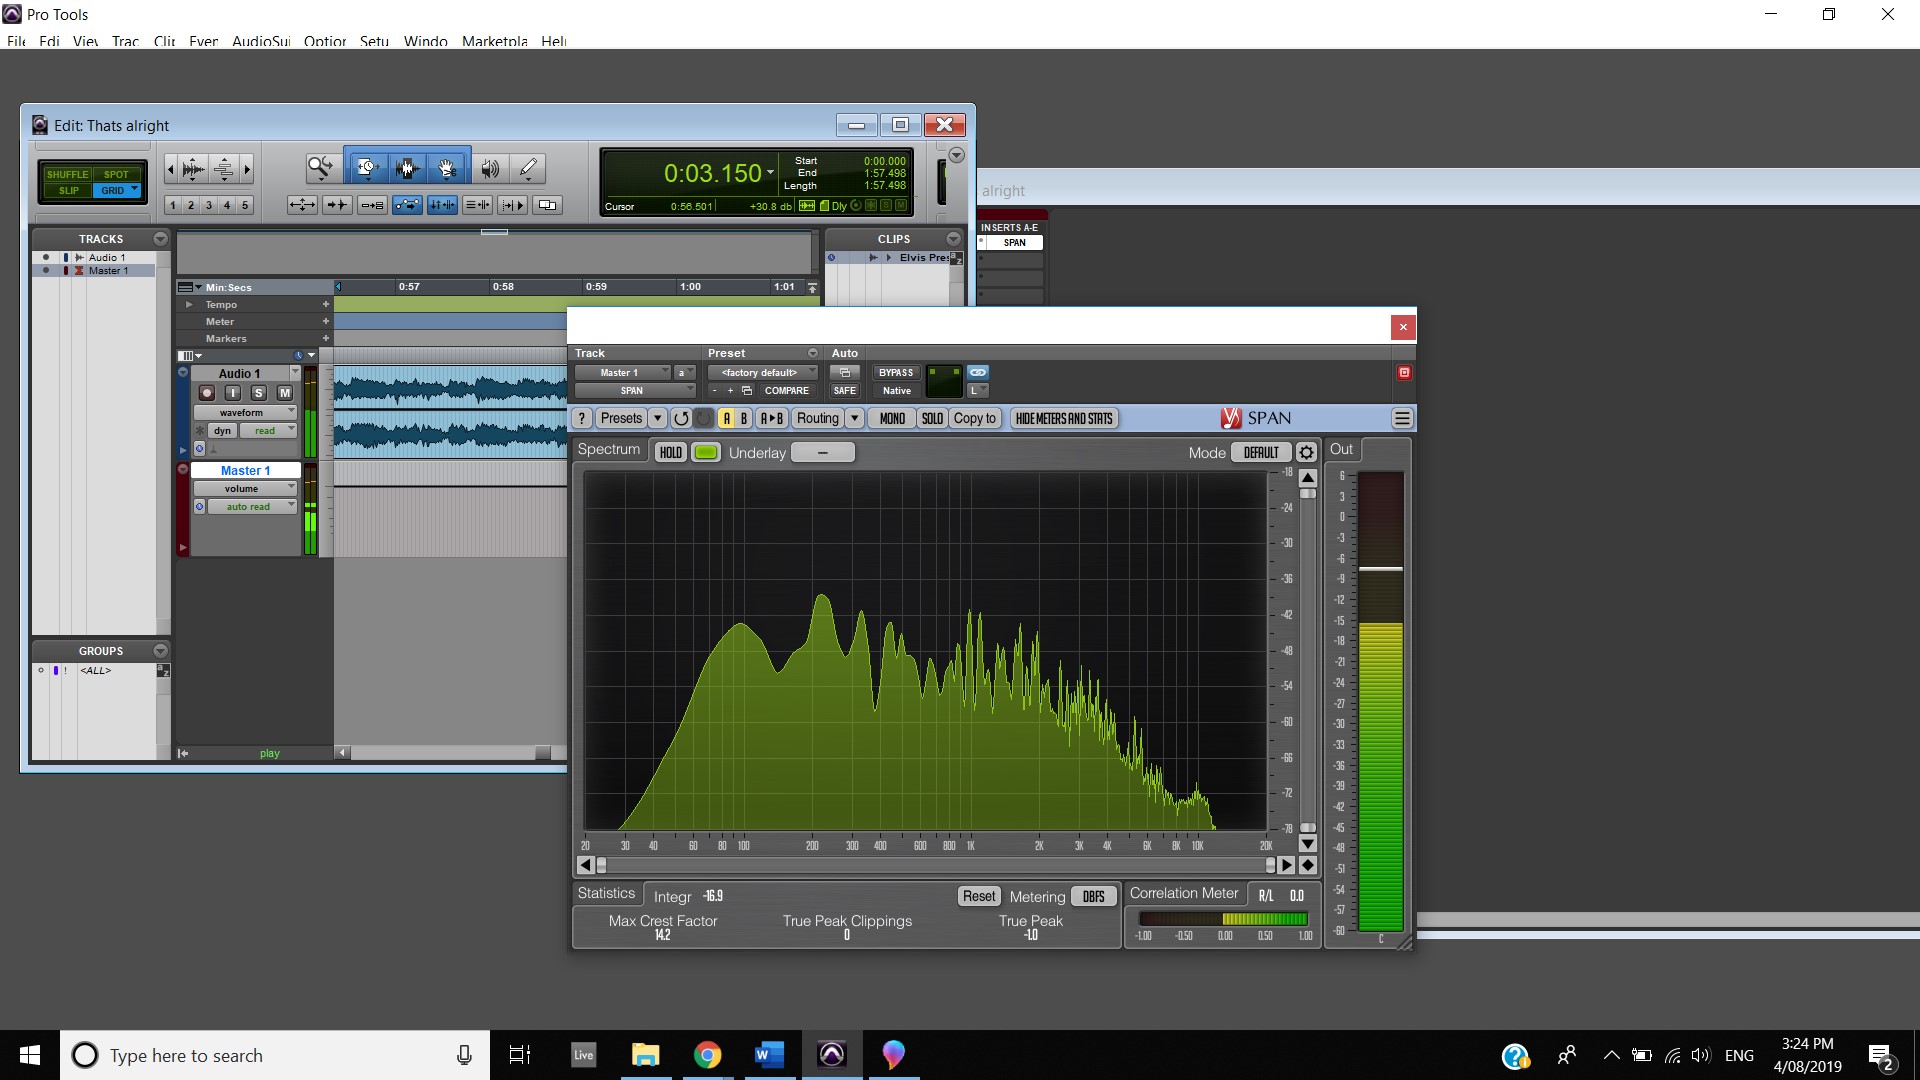
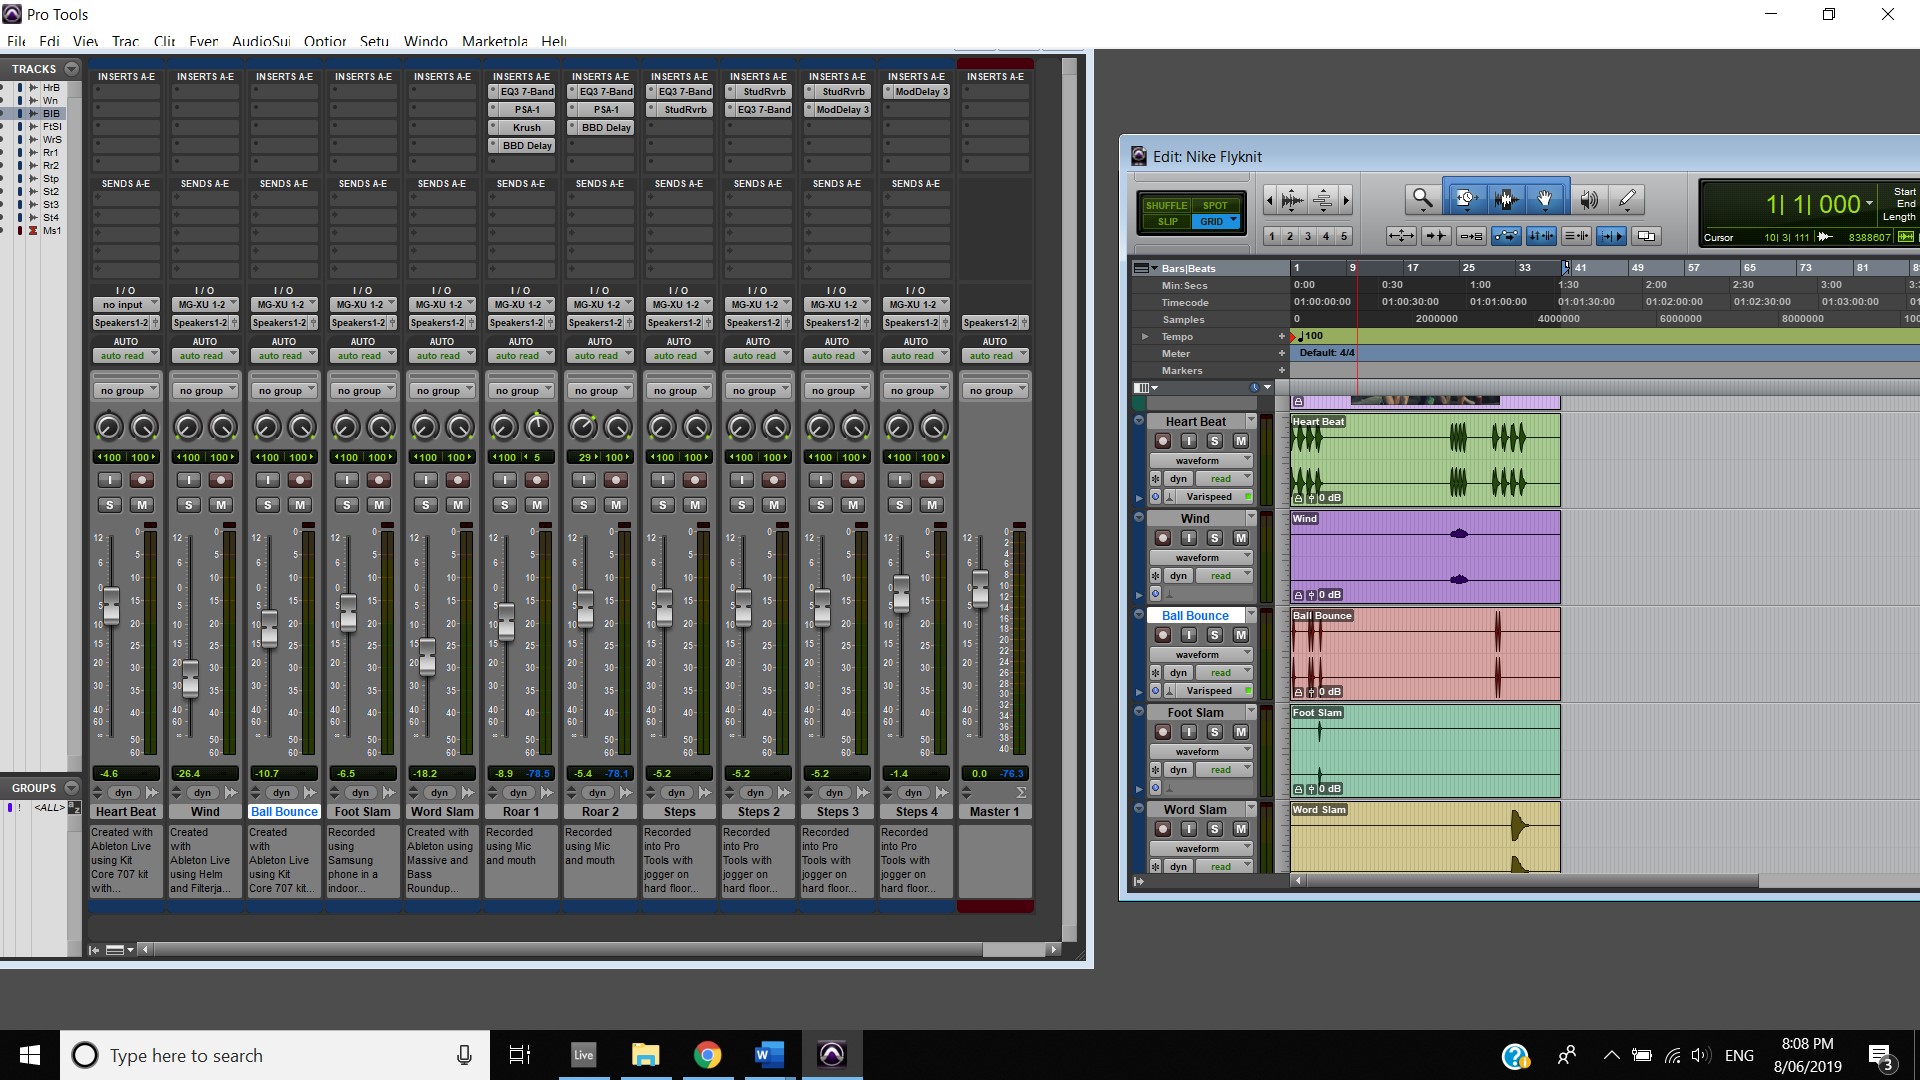
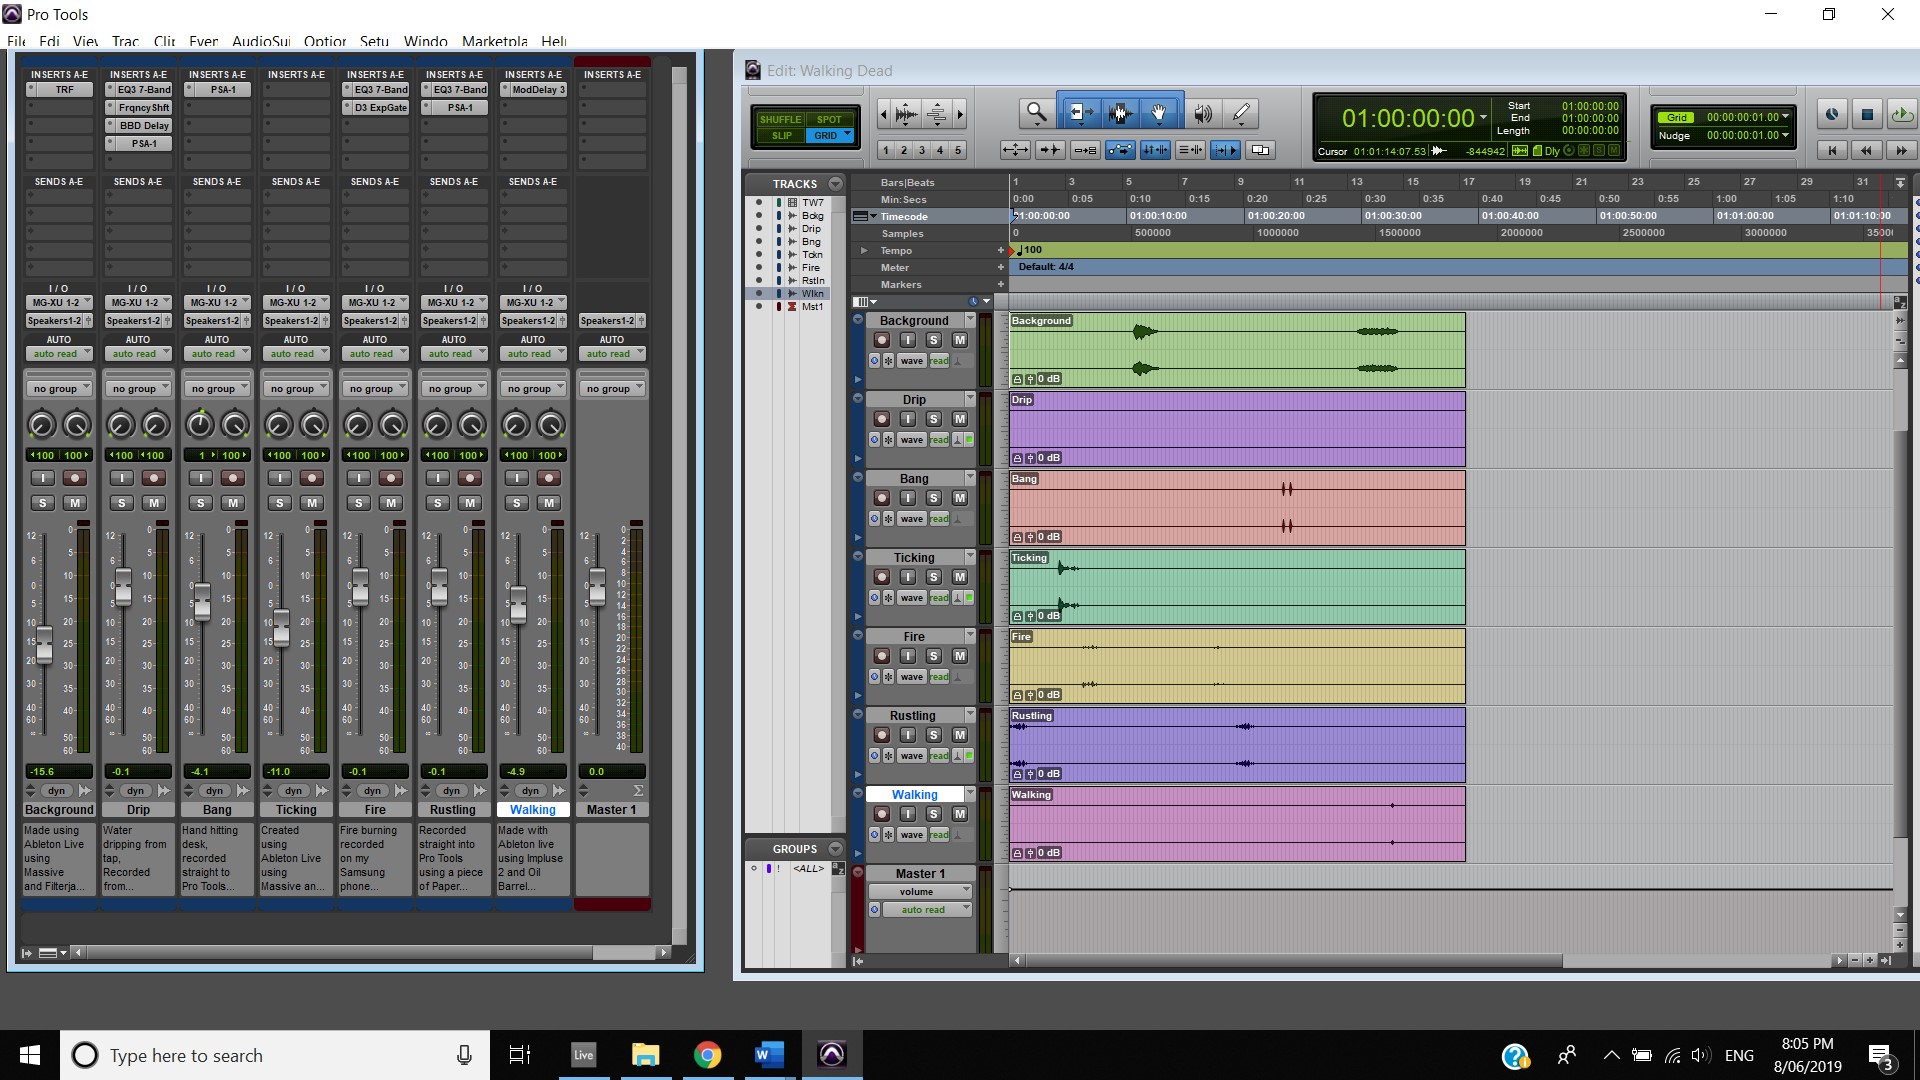
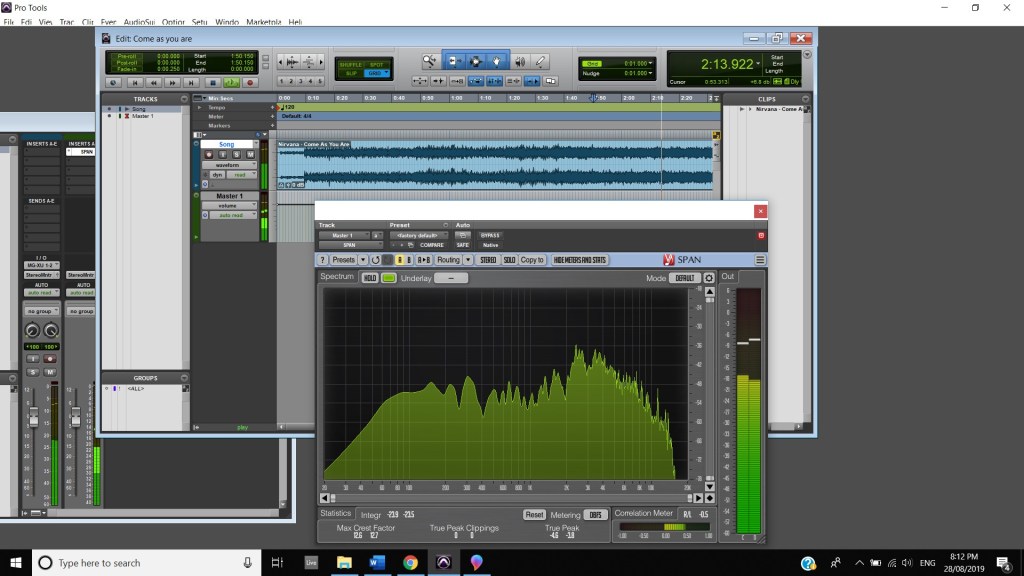
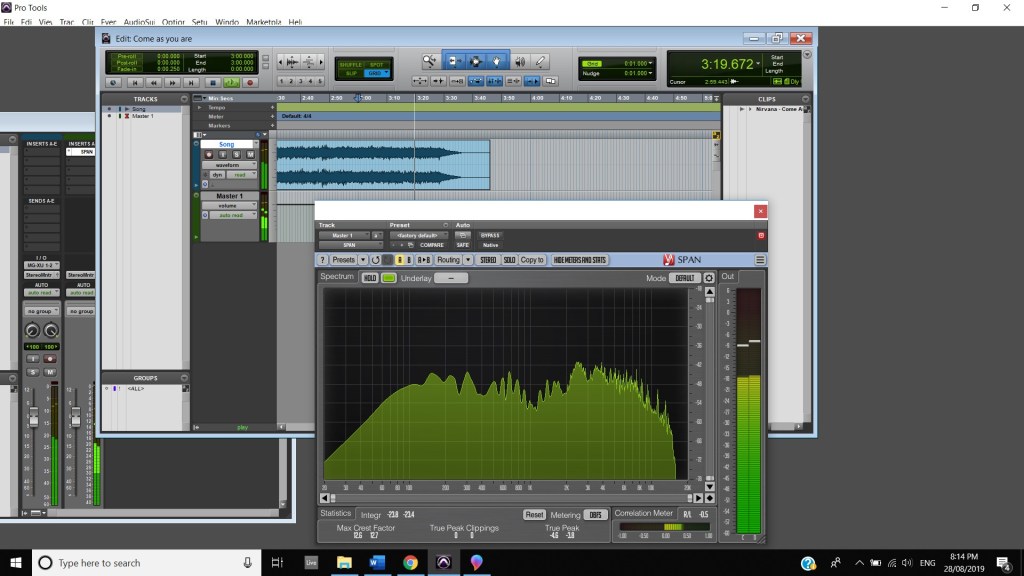
When the guitar pedal effect is taken off all of the frequencies balance out, shown in the first screenshot, although during the chorus the high frequencies boost themselves in the mix, shown in the second screenshot.

Guitar pedal taken off
Chorus

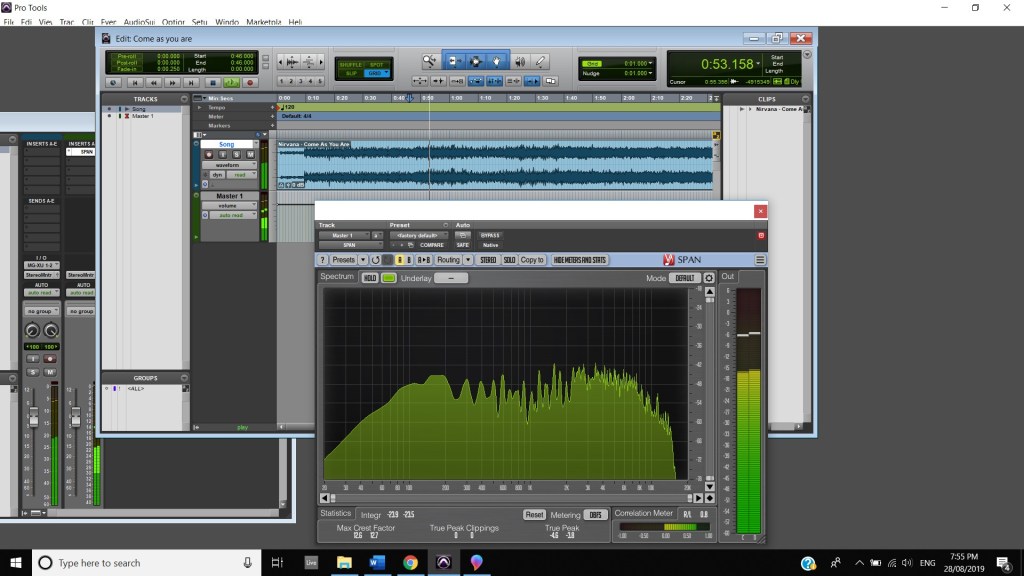
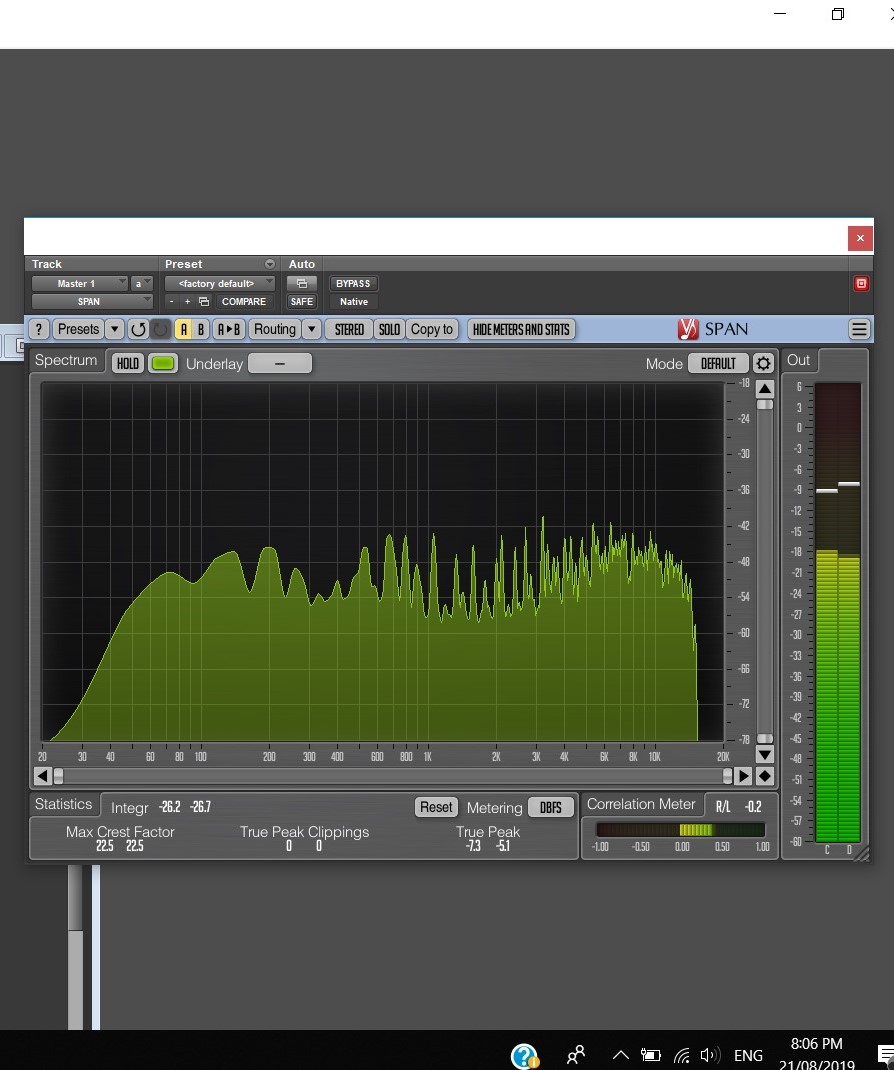
The boosted high frequencies continue throughout the guitar solo (First Screenshot) and when the last two “Memoria” are played where all frequencies even out.

Guitar solo
Memoria

The track is mixed fairly evenly throughout with the track peaking at -3.8 dB during the second Memoria at 1:25 mins, thanks to the drum roll. The track is at its lowest point during the intro where it hits -7.8dB during the intro (0:00 mins to 0:18 mins). After the intro the vocals raise the first verses volume to peak at -5.2dB. The guitar solo (2:00 mins to 2:33 mins) keeps between -6.7dB and -13.dB. Finally, the second loudest part of the song comes at 2:46 mins with the snare drum roll hitting -4.1dB.

In terms of track panning, the majority of instruments featured have centred panning including, the vocals, which feature in the foreground of the mix, the acoustic guitar, which also is in the foreground and the bass, which is placed in the background. The electric guitar featured in the track also has foreground centre panning, however, during the guitar solo, 2:00 mins to 2:33 mins, there is a channel automation occurring where the instruments panning to the left channel and then to the right and so on throughout the solo. Most of the interesting track panning occurs to the drums, the snare drum is always featured in the centre of the mix, the hi hats are in the left channel, the crash cymbal is placed far in the acoustic space, and during the verses it feature in the left channel shown at 0:42-0:44 mins, then it can be heard out of the centre as well as the left channel at 0:50-1:05 mins, finally during the chorus, the crash cymbal automates between the left and right channel as shown at 1:40- 1:55 mins. The Toms also feature in the right channel and this is proven at 1:07 mins.

Week 6: 1980s

Jump is a Synth rock/ Hard rock track by band Van Halen and was produced by Ted Templeman. It was released in December 1983 from the album titled 1984, this album was recorded entirely at Eddie Van Halen’s 5150 home studio. It is Van Halen’s most successful single to date and features a synth keyboard part played on an Oberheim OB-Xa, the synth line was written around 1981 by Eddie Van Halen however it was rejected by the other band members at the time. The track also contains a guitar solo which was cut together from different takes (https://en.wikipedia.org/wiki/Jump_(Van_Halen_song)). The track features David Lee Roth (Vocals), Eddie Van Halen (Guitar, Keyboards and Backing vocals), Michael Anthony (Bass and Backing vocals) and Alex Van Halen (Drums) (https://music.fandom.com/wiki/Jump_(Van_Halen_song)). This single is in the key of C major at 131 bpm in the time signature of 4/4 (https://findsongtempo.com/artists/van-halen/songs/jump-0a0c7124-f9db-47a7-a07c-b98f5d67e5fa).

David Lee Roth, the band’s lead singer mentions that the meaning and inspiration behind the lyrics was a TV news story in which a man was about to commit suicide by jumping off a building, this made Roth thought “might as well jump” (https://www.songfacts.com/facts/van-halen/jump).

This track is quite bright and dense, thanks to the inclusion of the synth keyboard, and is recorded in stereo and this is proven by the screenshot below.

Stereo Screenshot

In terms of track panning, the vocals, bass and backing vocals are all centrally panned. The guitar is quite interesting as for majority of the song it is panned to the centre apart from the synth solo where it is panned to the right channel as shown through 2:34 mins to 2:40 mins where it is in the background. The keyboard has multiple tracks, one has the main and famous synth melody coming through the left channel, accompanying this during the melody the right channel has delayed hits of the major notes of this as proven during 0:00 mins to 0:20 mins. The keyboard also has random long notes playing through the right channel throughout the track an example of this can be found at 1:00 mins to 1:15 mins. For the drums, during most of the song they are panned to the centre, although there are times where this is not the case, there is an audible cymbal hit on the right channel for example 0:59 mins to 1:15 mins and finally, the drum rolls bounce between the left and right channels to create effect and a example of this can be found 1:55 mins to 2:02 mins.

For most of this track the frequency levels are fairly evenly represented, although David Lee Roth’s vocal do spike the mid frequencies in parts throughout the track, especially during parts in the chorus and both of these are shown below.

Vocal Spike

During the Synth keyboard intro, the mid-high frequencies (300 hz- 6Khz) are boosted over the low frequencies (First Screenshot), this changes with the inclusion of the drums before the vocals (Second Screenshot) as the low frequencies level out with the mid and high making them all evenly represented.

Intro Pre drums
Intro Pre Vocals

There are also frequency spikes during the guitar solo and the synth solo. The guitar solo spiked and raised up the high frequencies (just past 2khz), shown in the first screenshot, while the synth solo, in the second screenshot, directly following the guitar solo boosted the mid-high frequencies. At the end of the track it fades out.  

Guitar solo
Synth solo

The track is mixed fairly evenly with the loudest point on the master fader being -5.2dB. During the intro it hits the lowest point on the master fader (apart from the fade out) at -10.7dB to -9.7dB. Throughout the rest of the track the master fader sits between -9.0dB to -6.0dB.

Week 5: 1970s

Higher Ground is a funk song that was written and produced by Stevie Wonder, it was recorded on the 12th of May 1973. The song itself was written and recorded within three hours. The album version contains an extra verse and is 30 seconds longer than the single version. There are many unique sounds that were used in this track for the time including a wah-clavinet sound that was created through the use of a Mu-Tron 3 envelope filter pedal and a bass line created by overdubbing Moog synthesizers. Stevie played all instruments on the track including vocals, Hohner clavinet, drums, Moog bass, tambourine and handclaps (https://en.wikipedia.org/wiki/Higher_Ground_(Stevie_Wonder_song)  & https://en.wikipedia.org/wiki/Innervisions). The track is in the key of C sharp at 126 BPM with a time signature of 4/4 (https://findsongtempo.com/artists/stevie-wonder/songs/higher-ground-8668f7c4-8fd0-4c6d-bc7e-f391c3df6ece).

The lyrics focus around Christian morality and other religious practices such as Buddhism,  for example the Samsara is shown through the lyrics “I’m so darn glad he let me try it again, Because my last time on earth I lived a whole world of sin” (https://genius.com/Stevie-wonder-higher-ground-lyrics).

The track is in stereo and is quite dense through with a lot happening proved by the screen shot.

Stereo Screenshot

All frequencies are fairly evenly represented throughout the duration of this track and this is proved below through the first screenshot, however, during the intro before the Moog bass comes in the mid frequencies are boosted and this is shown below in the second screenshot. The song then evens out but the mid (and sometimes high) frequencies do spike a little bit when Stevie sings his lyrics, shown through the Third Screenshot. The acoustic space here is quite dry and near apart from the Crash cymbal which has been given a far effect to it.  

Even Frequencies throughout the track

Intro frequencies
Vocal Spike

This track is mixed very high as it is being clipped at the master fader at a lot of points during the duration. When it is not being clipped the track sits around -3.0 dB to -0.1 dB before it clips again. The intro is the quietest part of the track at -4.3 dB before the drums and Moog bass start playing and then clips shortly after this, other than the intro it begins to lower its dB during the fade out of the track. The tone of the track is quite bright with how the Hohner Clavinet is being played gives it a jumpy and funky feel. The lyrics are also cause bright and inspiring and is shown through the lyrics “ ‘Til I reach my highest ground, No one’s going to bring me down” (https://genius.com/Stevie-wonder-higher-ground-lyrics).  

Track panning is quite interesting for this track, in particular the drums. The Vocals are panned to the centre and is the loudest in the mix. The Moog Bass is also panned to the centre and is in the background of the mix. The Clavinet has two parts and each separate part is panned to either the Left channel or the Right channel, the separation between the two parts is clearly highlighted during the intro (0:00- 0:25). For the drums, the snare part is panned a little to the right, the Tambourine and the Hi Hats are panned to the left. The crash is quite interesting as for most of the track it is panned hard to the right and given a “far” acoustic space feel, however there is certain points where it is centred for effect, for example from 01:25 to 01:42, where it alternates between the right channel and both channels, there is also the same centring effect is used for the hi hat as shown at 01:20.

Week 4: 1960s

Tomorrow Never Knows is a rock song by The Beatles and was recorded and released in 1966. The track was written by John Lennon and Paul McCartney and produced by George Martin. It is said that this marked a different turn for the Beatles as the band fully embraced the potential of a studio without any consideration of reproduction live in concert. Lennon found his inspiration from the book “The Psychedelic Experience: A manual based on the Tibetan Book of the Dead” while on LSD, Lennon recorded himself reading the book and played it back while the drug took over and was so excited by the result he wanted to capture the LSD experience in song (https://en.wikipedia.org/wiki/Tomorrow_Never_Knows) & (https://www.beatlesbible.com/songs/tomorrow-never-knows/).

The track features John Lennon (Vocals, Organ and Tape Loops), Paul McCartney (Lead Guitar, Bass and Tape Loops), George Harrison (Guitar, Sitar, Tambura and Tape loops), Ringo Starr (Drums, Tambourine and Tape Loops) and George Martin (Piano) (https://www.beatlesbible.com/songs/tomorrow-never-knows/). The Track is in the key of F at 128 BPM with a time signature of 4/4 (https://findsongtempo.com/artists/the-beatles/songs/tomorrow-never-knows). The song had very revolutionary production techniques at the time with the use of reversed sounds, tape loops, automatic double tracking and experimental instrumentation/ recording. The night before they recorded the song, Paul McCartney created 16 tape loops of guitar sounds and odd vocals.

The continued Tibetan influence is shown with the modified sounds of the Sitar and Tanpura. Not only was Lennon’s vocals double tracked but his vocals were recorded while played by a Leslie speaker which modified the sound by rotating the loudspeakers this gave the vocals a near effect as well as a far, reverberant effect. (https://genius.com/The-beatles-tomorrow-never-knows-lyrics) & (https://www.songfacts.com/facts/the-beatles/tomorrow-never-knows).

Looking further into the production itself, the way it is recorded in stereo is quite unique with the vocals panned to the right (there is some vocals at 0:01-0:02 coming through the left channel) and the rest of the instruments panned to the left and have a dry feel which creates an interesting effect. The drums have been centred for this track however there is some drum hits/effects on hits that do come through prominently on the right channel.   A screenshot of this Stereo format is provided below. The track itself is very dense through the duration of the track with lots of things happening at the one time but it builds up to this dense feeling through the use of quite a sparse introduction and it builds from there. The record is mixed very high at the master fader clocking at -3.9dB during intro before the drums (0:05-0:14) and reaching between -0.6dB to 0.0dB during the body of the song, 0.0dB was the most common read through this track however the intro (0:00-0:05) was the lowest at the master fader at -14.6dB. Looking into the frequency analyser it is very clear that all frequency levels are fairly even and represent well within this track, however there is a slight spike in the mid frequency when John Lennon sings the vocals, this is proven via a screenshot taken at 0:22 below. During the first half of the intro the low frequencies are boosted and this is shown below, however for the second half of the intro the lows seem to almost disappear and the mid frequencies are boosted and this is also captured below.  

Stereo Screenshot


Lennon Vocals
First Half Intro
Second Half Intro

You’ve Lost That Lovin’ Feeling is a single written by Phil Spector, Barry Mann and Cynthia Weil and recorded and released by Bill Medley and Bobby Hatfield (known as the Righteous Brothers) in 1964. The track was produced by Phil Spector and featured Spector’s Wall of Sound recording technique. Music writer Robert Palmer said this technique was used to create a sound that was “deliberately blurry, atmospheric, and of course huge; Wagnerian rock n roll with all the trimmings”.  Due to this historic technique the single was inducted into the National Recording Registry by the Library of Congress for being “culturally, historically or aesthetically significant” (https://en.wikipedia.org/wiki/You%27ve_Lost_That_Lovin%27_Feelin%27). The recording of the single took place at Studio A of Gold Star Studios in LA. The instrumental tracks were recorded, cut and layered to create the wall of sound effect prior to the vocals being recorded. All recording was done mono so Phil Spector could modify the sounds to his tastes. Spector and Larry Levine (Sound Engineer) started by recording four acoustic guitars, then three pianos, then three basses, then two trumpets, two trombones and three saxophones and then the drums before the vocals and strings overdubbed on a separate track.  The instrumental tracks feature the musicians known as “the wrecking crew” with Don Randi on piano, Tommy Tedesco and Barney Kessel on guitar, Carol Kaye and Ray Pohlman on bass, Steve Douglas on sax and Earl Palmer on drums. The background singers were a vocal group known as the Blossoms and joining them was a young Cher (https://en.wikipedia.org/wiki/You%27ve_Lost_That_Lovin%27_Feelin%27). The track is in the key of C major at 95 BPM with a time signature of 4/4 (https://findsongtempo.com/artists/the-righteous-brothers-714d40cd-b9e9-4ad9-bb1d-5c581f08f798/songs/you-ve-lost-that-lovin-feelin-f33911eb-08b1-4d2c-893c-808870010e4f).

Another production technique Spector used was that he made the musicians wear headphones which was a new concept at the time and this was used so the musicians were aware of how much echo and other effects Spector was placing on them and their instrument (https://www.stereogum.com/2006380/the-number-ones-the-righteous-brothers-youve-lost-that-lovin-feeling/franchises/the-number-ones/).

As mentioned above all recording for this track was recorded in mono however it is mixed, this is proven by the following screenshot and the track panning. In this track the vocals (including reverb effects) and the strings are panned to the right and the rest of the instruments that feature the wall of sound technique and background singers are panned to the left.

Track Screenshot

In terms of dynamic range, the track starts soft at the master fader (-5.6 dB during the intro) then slowly starts to be mixed louder as it the master fader hits between -4.6 dB to -3 dB during the pre-chorus then hits -2.3 dB during the first chorus then lowers to between -6.0 dB to -2.0 dB during the second verse only to raise to -1.4 dB during the second chorus. The track gets to its softest point post the second chorus reaching -12 dB then builds during this time to reach the finale and fade where it reaches its loudest point at -0.9 dB. The tone for the track overall has a quite middy tone however there is aspects of this production that have a bright tones (Strings and drums) and dark tones (Medley’s basso vocals). The lyrics themselves have quite a sad, dark tone to them, for example, “You never close your eyes anymore when I kiss your lips” or “If you would only love me like you used to do, yeah” (https://genius.com/The-righteous-brothers-youve-lost-that-lovin-feelin-lyrics).

Throughout most of the duration of the song all frequencies levels are fairly evenly represented. There are a few parts of the track where this is not the case. During the beginning of the track Medley’s basso vocals boost the low frequencies quite high and this is shown below.

Medley Bass intro

The frequencies even out as the song continues (First Screenshot below) however the mid frequencies do spike (Second Screenshot below).  The high frequencies mainly spike through the hit of the tambourine, shown in the Third Screenshot below, however it was never enough to be boosted higher than the other frequencies.

Even Frequencies
Vocals
Tambourines

Week 3: 1950s

How high the moon is a jazz tune originally written by Nancy Hamilton and Morgan Lewis (https://en.wikipedia.org/wiki/How_High_the_Moon). It was originally performed in the 1940 on Broadway by Alfred Drake and Frances Comstock. On January 4 1951, Les Paul and Mary Ford recorded their own version of the song. The song is written in a 4/4 time signature in the key of B minor at 120 BPM (https://findsongtempo.com/artists/les-paul/songs/how-high-the-moon-45050c6a-4efe-476d-8f57-f9fc2c994e0b). This version was recorded on a Ampex 300 reel to reel tape machine modified with a fourth head to allow sound on sound recording and is vastly different from the original version of the song as there is no other instrumentals parts apart from Les Paul playing all parts (including the bass) on the  electric guitar and Mary Ford’s layered vocals (https://www.guitarplayer.com/players/gp-editors-favourite-recordings-by-les-paul-how-high-the-moon). There is 12 different guitar parts and 12 different vocal tracks (http://www.loc.gov/static/programs/national-recording-preservation-board/documents/HowHighTheMoon.pdf) that Les Paul recorded on to the Ampex 300, The slapback Echo for these parts was also produced on this machine. Mary Ford’s vocals are layered multiple times and the use of room reverb has been taken advantage of, this is mainly shown during her “solo” at 1:53-2:03 mins. There is a lot going with this version of the song with the build-up of guitar parts truly carrying the song along which gives it a bright and jumpy feel compared to the original, however, there is two parts throughout the song in which the denseness of the multiple guitar tracks disappear and Mary Ford’s vocals only remain, these are at 1:29-1:31 mins and 1:53-1:55 mins.

Looking more critically into the production, it is a mono recording as shown with the screenshot below.  

For most of the production the frequencies are fairly balanced with only the high frequencies being slightly emphasised followed by the lows, this can be proven when Mary Ford is singing her verse (First Screenshot) and during the guitar solo (Second Screenshot) both shown below.  The high frequencies really are emphasised however at 1:09-1:19 through Mary Ford’s vocals. The mixing at the master faster is fairly constant at -3.4db for most of the record however it does bounce to -2.4 dB during Mary Ford’s vocals at 1:09-1:19. The vocals in the mix are blender in louder than the rest of the guitar parts throughout this record, the guitar parts themselves are blended in the background.  

Mary Ford Verse Singing
Guitar Solo

That’s All Right is a song originally performed by Arthur Crudup, However, it is known as the breakout debut single recorded and released by Elvis Presley. This was recorded on July 5 1954 at Sun Studios in Memphis, Tennessee (https://en.wikipedia.org/wiki/That%27s_All_Right). This version of the song was recorded in a 4/4-time signature in the key of D major at 104 BPM quite upbeat and fast texture compared to the original (https://getsongbpm.com/song/that-s-all-right/G6AMD7 & https://tunebat.com/Info/That-s-All-Right-Elvis-Presley/1mKhiITXCIpves7QbT4xo7). The recording features Elvis Presley providing vocals and acoustic rhythm guitar, Scotty Moore on lead guitar and Bill Black on double bass and there are no drums or other instruments. It is produced by Sam Phillips and all parts were played at the same time on one single track (https://en.wikipedia.org/wiki/That%27s_All_Right).  The song itself came about by accident as the trio were having a break and during this time Elvis started playing That’s All Right in a fast style, the other two musicians jumped in and Sam Phillips made them start again so he could record it. Listening to this record you can tell that is was recorded in mono (https://www.discogs.com/Elvis-Presley-Thats-Alright/release/5786889) and live based on the instruments and how far they are from the microphone, this creates a unique listening experience as Elvis with his guitar are closest to the microphone and almost have a panning right stereo effect in the headphones, the bass and the lead guitar are place further away in the mix.

For most of the recording the mid-high (500-2K) frequencies are emphasised, however, the use of the bass in the intro drives up the low frequencies until Elvis vocals come in as shown below.  Overall it is mixed fairly loud nearly clipping the master fader at -1.5dB however the peak is -0.6dB at 1:03 mins during the instrumental. The softest is during the intro where it hits -6.7dB.

Mid-High frequencies boosted
Bass Intro

Week Nine 22 JUN 19

To start off week Nine I focused on working on my Nike video so I was able to zip it and upload it to Google Drive. I looked over the video to see if I was happy with it, I modified one of the roar tracks so it was more in sync with the video and I also added steps to the part where all of the runners are running as without it seemed a bit bare. I went onto the volume and panning of all tracks and was happy. I just zipped the file up and uploaded it to Google Drive.

Moving onto my final video being the Unravel video I wanted to include a car horn in the video for the scene with the car and how it swerves. I recorded my car horn with my Samsung phone and placed it onto a new track. I then added a DC distortion and increased the bass and lowered the Treble while keeping the distortion at zero. Next, I added an Arena studio reverb and increased the decay and decreased the mix. Finally, I added the White Boost and modified the skinny preset by increasing the Treble just a tad and cutting the bass.

This week I moved houses so I was quite busy and it took me some time to get around to focusing on this week’s activity. This week’s activity focuses on using the MG10XU mixer and the built-in effects to achieve new sounds. Having uploaded all of my submissions except for the unravel one I have very limited opportunity to incorporate this into my work. However, I do still want to include a sound/noise for when the rodent appears on the screen in the video and this technique could possibly help me achieve the desired sound I am looking for.  

Working on the dark bassy hit for the rodent I started in Ableton using massive and I heavily modified the impact preset to create an airy bassy hit.  I then transferred it over to Pro Tools and using the techniques shown in this week’s lesson I was able to impose a delay onto this sound using the MG10XU mixer. I then selected the Sans Amp plug in and selected the metal lead 1 preset however I turned a lot of the settings down so it wasn’t clipping the track. I then added another delay in BBD Delay and this help emphases the delay that I wanted for this track. Finally, I added a Soneq plugin to raise those low frequencies. On final inspection of this sound I felt that it didn’t really capture the “danger” that the scene is showing. So I added a Distortion and raised the volume of it so that the distortion comes over the top of the bass hit to create that feeling of danger.

On my last viewing of the unravel video before I was going to submit it, I thought there should be some sort of video game tick etc for when the character holds up the flower. I opened Ableton and on the new track I opened Helm and played around with the preset called 90s videogame pluck, I then created a sound I like, exported it into Pro Tools and added an Orange Phaser.

I then check all of the sound levels and track panning, zipped up the file and uploaded it to Google Drive for submission.

Week Eight 15 JUN 19

I started this week by working on my Sine Wave composition. I consolidated all tracks and starting mixing and editing the track panning. I also changed the way the second snare worked in conjunction with the first snare. I added a mod delay 3 to this snare track and selected the preset slapback delay. I also cut down this track so it was only heard during only selected parts of the second half of the composition. After all of the consolidating and the track panning was complete and the clip bin emptied, this composition was ready for submission.

Getting into the activity for this week, it focused on the first part of Mixing & Automation #1. It included a video on Basic Clip Envelopes. I found it quite interesting although I feel like at the basic level (for example how in the video he played with the volume modulation to go to 0% in the middle of the clip) there are other easier methods to achieve the same outcome, but at the more involved use of the clip envelope e.g. only making every 16th note active, I can see the usefulness of this and I will try to incorporate this into a submission, possibly the Nike flyknit video.  

Finalising my sounds for the Nike video, I wanted to include a “coin drop” noise for when Kobe makes the basket just like in NBA2K and in the real NBA games. I recorded into Pro Tools the noise of me hitting a breakfast bowl with a drum stick. I used the TCE function to modify the clip shorter so the noise itself was a lot sharper and high pitched. I then added a number of effects to make the high pitch “coin” sound that is the final product. I started off with a EQ3 7-Band and modified the HF on the Add Air preset, I then added a Sans Amp and selected the Fusion Lead 2 preset however I completely changed all the settings and brought the highs up and lowered the crunch and drive. I then added a Studio Reverb and then used the Arena reverb and increased the mix. Finally, I selected the Pitch 2 and increased the coarse to 12 semi. Below is a YouTube video of the sound of the coin drop included in the NBA2K video games and also the sound I created:

Coin Drop

Due to being placed on a promotion course at work that starts at the start of WK 10, I will need to submit my assessments at the end of WK 9 as the work load is quite large and involves nightly homework tasks. So, this week I zipped my Sine Wave composition and my Walking Dead submission and uploaded it to Google Drive. I wish to have the other two videos uploaded by next Friday.

Week Seven 08 JUN 19

This week had no lessons involved with it so it gave me a chance to continue work on my assessment submissions. I decided to continue with the Unravel submission first and after looking at the list which I constructed a few weeks ago on sounds I wanted to include in the submissions, I wanted to focus on the crash noise for when the character crashes into the bucket towards the end of the video. I wanted to create from something not really obvious for this and after much experimenting and thought I went with hitting a pair of tongs against a baking tray. I recorded a number of different hits to decide which one was the best and went with two different ones, a short light hit and a hard, echo hit. I then placed these in two different tracks as I wanted to give them two different effects. For the first one I added a Sans Amp and modified the Metal Lead 1 preset, I also added a Studio Reverb and modified the Studio Time preset. The second track I added a Sans Amp and selected Metal Rhythm 3 preset and modified it. I also moved the Left Pan Knob to the 73 position on both tracks.

I wanted a rustling sort of sound for the Walking Dead video when you can see shadows of arms etc and this noise would simulate the movement and I achieved this by recording straight into Pro Tools me scrunching up a piece of paper. From here I wanted bring out the low frequencies and make the recognisable paper sound of the picture. Firstly, though I added an EQ 7 Band and by playing around with the preset of outside the club I was able to remove the scrunching of the paper, then by adding a Sans Amp I was able to give it a bit more of a bassy sound. The final result was a sound which reminding me of rambling though something and making movement sounds.

I recorded some footsteps in my joggers on a hard surface for use in the Nike video. I wanted to record them on the steps outside of my apartment but it proves to be too difficult due to background sounds. So, I used my mic and recorded taking steps on my kitchen floor. I started cut the recording and placed it into the right place. I made two different tracks of steps. The first track had a small hit of my jogger to the floor and this was for the guy running up the stairs. The second track I had a stronger hit of my jogger and I planned to add some reverb to this to symbolise the woman sprinting around the track. I then realised I wanted a delay on the hit where the video zooms up on the shoes, so I created two more track to add delay to them. I played around with many effects on these four tracks to give them all a very different and unique sound. For the first track, I added an EQ 7 Band and a Studio Reverb with the reverb effect Jazz Club selected. Moving onto the second track, I placed a Studio Reverb first with the reverb effect Small Room and then threw EQ 7 Band over the top. The third track I selected the Garage reverb effect on Studio Reverb and then modified the Mod Delay preset of Spaced. For the final track I used for the running steps I just used a Mod Delay and simply used the Muted Delays preset.

To end the week I started doing some final tweaks to my Walking Dead video and my Nike video. I consolidated my clips and worked on the mixing to make sure the master fader wasn’t clipping. I also used the TCE function to stretch the roars in the Nike video to make it in sync with the slow motion. Finally for this week I added the horror synth I created in week two to the walking dead video. I chose to place it in random parts like the knife part and the bird part just to add a bit of horror and a uncomfortable feeling for the viewer.

Nike Progress 08 JUN 19
Walking Dead 08 JUN 19

Week Six 01 JUN 19

I started week 6 by uploading all of the sounds that were created on my sound bank onto Pro Tools and placed them where I wanted them to be. I had no real difficulty doing this and it didn’t take a lot of time as I already had a good idea where I wanted these sounds.

Looking into the activity for the second week of effects processing, it focused on the plugins of Digits and Krush. I learnt that Digits is called a phase distortion synth and quoting Wikipedia here “is similar to phase modulation…. Both methods dynamically change the harmonic content of a carrier waveform by influence of another waveform in the time domain”. Also according to Wikipedia at the following link https://en.wikipedia.org/wiki/Synthesizer this method has more complex waveforms other than the standard square, sine and sawtooth waves, this is in contrast to many other synths such as Helm and Massive etc.

Looking into the Krush plugin I can see how easy and simple it is to use and how I am able to incorporate this plugin into my future sounds for the submission of my assessment.

I started work on that fire recording I took last week and uploaded it directly to the Walking Dead Pro tools session. I noticed that during the recording it was quite windy, not to the point where the sound of the fire is unusable but to the point where it is noticeable. So, after I chopped up parts of the recording and placed them in the right position, I went to work trying to remove that background noise of the wind. I started by adding an EQ3 7-Band and trying my best to remove those lower frequencies. I also changed the fades leading in and out of the sound so that the sound doesn’t make that little pop noise. By modifying the EQ3 7-Bands preset Cell Phone to my liking I was actually able to remove most of the background noise. Finally, I added an Expander/Gate and using the Vocal Expander preset I was basically able to full remove the background noise. This sounds a lot better than the sound I started with. I am happy.

I continued on my Nike submission this week, I wanted to start by recording a “roar” using a mic straight into the Pro Tools session for the use of when the man running up the stair’s yells in slow motion. Before starting to record I knew I wanted a roar which was short as I wanted to give it some delay as I think it will compliment the slow motion quite well. I recorded four or five different samples of me yelling into the mic and from there I picked three that I liked and started working on adding some effects to these sounds to see which one sounds the best. I selected a EQ3 7-Band and selected the add subs preset to bring up the low frequencies and then added a Sans Amp and then selected the Crunchy Bass preset and modified the settings a bit to make the lows more evident. I then added the Krush plugin and then selected the preset Crunchy Tremolo and turn the effects right down so it isn’t as strong and provides a similar effect to ping pong delay in Ableton Live. Finally, I added a BBD Delay and modified it so the end of the roar had a nice echo and delay. I then duplicated the track three times and lined up each of the three samples in the correct place so I could compare them. I got rid of one fairly quickly and I couldn’t decide between the last two of them. So, I decided to use both, however on the second one I deleted the Krush and moved the sample a frame later than the first one. I then modified the track panning; I moved the first roar to the left and moved the second to the right. The final product being a loud roar with some nice echoing effects.

Continuing work on the Sine Wave composition I duplicated the snare track and added an Eq 7 band and modified this to give it a different sound. I then turned the second track down and moved the panning so that the left pan knob is pointing at the 12 o’clock.

Week Five 25 MAY 19

This week I was still out on this work trip so my ability of getting much work done was limited. However, I did start the week working on my Sine Wave composition. I moved the track panning of Bass 3 back to the middle as I think it sounds better this way. I also renamed Synth 4 and 5 to Chords 1 and 2. This is mainly for ease of work and to create less confusion. I also moved some notes from chords one to chords two.

I also continued work on creating noises for the sound design assessment. I created a ticking noise for the walking dead composition for use during the scene where clock piece is shown. This was created using the Oriente preset on the Massive synth and modifying the Oscillators and the band reject filter and the lowpass filter. A loop ticking corpus was also added to this effect and I modified the delay and also the brightness and the inharm. The final result is a dark hit which ticks out. I believe this is very useful for the walking dead theme to support this horror idea.

I also created a Nike word slam for use when the words “Light. Strong. Nike Flyknit.” This will be used to create emphasis on the words which a nice bass hit. This aspect was created using the sub impact preset on massive and the bass roundup preset amp on Ableton. The bass was turned up to 10 on the amp.

I also worked on the footsteps that the zombie makes in the walking dead video. For this I just duplicated the leaf noise used for the unravel video and then turned up the velocity of the notes. I also made some changes to the Oil Barrel reverb preset to make it less crunchy, I turned down the pre delay while also turning down the decay time. The decay time was the main factor of how crunchy the sound was. I also turned down the global volume of the tambourine and the decay on the instrument rack. Finally, I edited the Wide and Dirty preset by turning up the frequency and modifying the width and amount. The final effect I believe achieves the sound of the zombie walking thorough the waist high grass.  

Continuing progress on the Unravel video this week, I started by working on a sliding sound for when the character is sliding down on objects. I opened up Helm and selected the CM Riser preset and modified the ADSR to my liking then recorded into Ableton a few hits of this new sound. I then exported the sound and then re uploaded it into Ableton as an Audio track so I can reverse the audio for use of the sliding effect.  I then chopped the clip up and made a short slice, a long slide and an even longer slide. I did this as I noticed that in the video the slides had different lengths. Finally, I added the Empty Club reverb to give it a nice slide feeling, I then adjusted the fades.

On the last night of my work trip we had a fire, I took this opportunity to record a sample on my Samsung phone for use in the Walking Dead video. I am not overly sure if this will work or not but there was a fair amount of wood crackling in the video so I might be able to use this with the help of some sound effects etc.  

After returning from my work trip on Saturday I was able to actually check out the activity for this week. This week focused on effects processing #1 and included a video focusing on the many topics within this such as Duplicating and layer tracks as an example. Watching the video, I found it interesting to see how Duplication was used and how it was used to make the snare in this example sound different and give it more life. Watching the lecturer do the example of how to print an AUX input track I definitely felt like I want to use this method but I am yet to know where. I currently have a reverb AUX track so I might try there.